Στο νέο online παιχνίδι καζίνο του Nine Casino, εμπνευσμένο από τον κόσμο της κατασκευής στένσιλ, οι παίκτες μπορούν να δημιουργήσουν τα δικά τους μοναδικά μοτίβα για να ξεκλειδώσουν ειδικά επίπεδα παιχνιδιού. Immediate Byte Pro Neoprofit AI

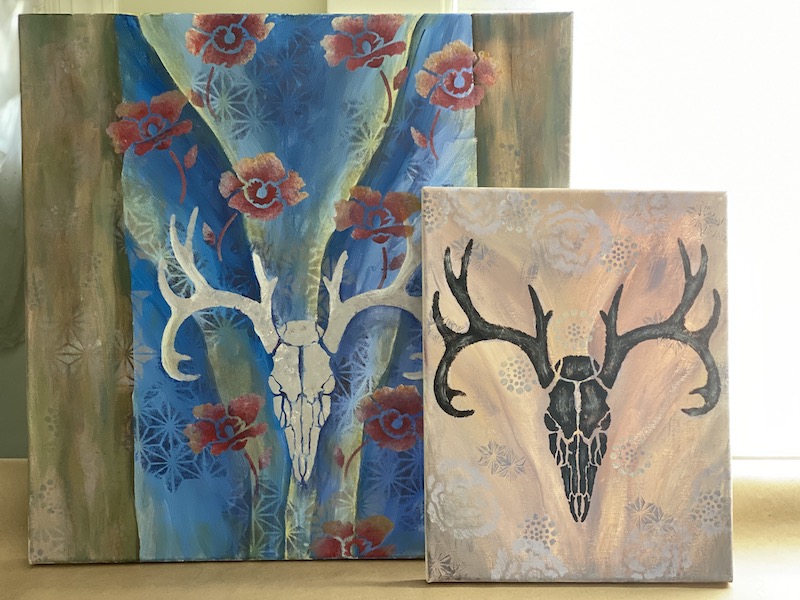
This project was a definite nod to the great artist Georgia O’Keefe. Ahead of her time in her work, she paved the way for women artists in Modern Art. From minimalist cityscapes to sensual flowers and glorious landscapes, her work is known around the world and inspired artists for decades.

Materials And Supplies:

Process

Color mixing

For this project, I mixed up some purples, pinks, and yellows to start. I used a lot of titanium white and mixed up a few darker hues to create a lot of shading and gradation for the background.

Step by step process

For the background, I painted out a few dark brown paint strokes using lines that would mimic the shape of the skull. I did some basic shading and gradation with different values adding white and blending pinks and yellows on the canvas.

Next, I stenciled in the radial pattern and Asian star pattern using colors already mixed on my palette and used variations of the colors I used in the background painting. I wanted the stencils to blend in but add texture and interest. I loaded the brush frequently and no water was added,  allowing for thicker layers of paint while preventing bleeding under the stencil. I used a small stencil brush for the radial pattern, tapping the thick paint on while holding the edges of the stencil down firmly. For the Asian star pattern, I used a flat paintbrush to sweep across the stencil in a few quick strokes to give the impression of the shape and uneven texture I was looking for.

Then, I mixed black and brown for the skull. I wanted the skull to have texture and be pretty solid in color, so I mixed up a little more color for that than usual. No water was added and I reloaded the brush frequently to get the amount of paint on the canvas that I wanted but built it up a little at a time. I used the tapping technique with a medium stencil brush, ensuring to press the edges of the stencil down firmly as I applied the paint.  After it dried, I applied highlights to the skull with dry-brushed light purple paint.

The final step was to use the stencil to paint seven flowers to create a border. The first layer was pale pink, then I went over that with a bright yellow with orange for shading and depth.

I had a lot of fun mixing colors and playing with sizes. A lot of the color mixing happened on the canvas, it was a really freeing process and the results were so different each time. I hope you have as much fun with this project as I did!

This project was made by our lovely friend, Teri @tjaneiro2 on Instagram
Please share your creations with us @stencil1.com


Enter to win a FREE Stencil1 Deer Wall Stencil!

Every week for the month of March, we will be giving out one Stencil1 Large Antlered Deer stencil.  A $29.99 value, for FREE! Perfect for your wall or any of your large-scaled DIY projects.

How-to Enter:

  1. Follow Stencil1 on either Facebook and/or Instagram.
  2. Share this post on any of your social media accounts.
  3. Tag @Stencil1 and hashtag #OhDeerStencil1
  4. Tell us how you will be using the deer stencil

Each account will count towards an additional chance to win, so be sure to follow us on all social media!

We will pick each winner randomly and announce the winner via social media every FRIDAY for the entire month of March.

For US customers Only!

Good luck, stencilers!


Deer_slab_Stencil1_01
Deer_slab_Stencil1_02

This DIY uses our two-layer Antlered Deer stencil. These two layer stencils consisting of a silhouette layer and a detailed layer really give your project more depth. Here’s how to do it:

We did another Target haul and picked up these awesome wood rounds that are a part of Target’s Handmade Modern collection. The deer fits beautifully on these slabs!

Deer_slab_Stencil1_03

A beautiful, natural canvas.

Deer_slab_Stencil1_04

First, place your silhouette stencil where you would like the design to appear.

Deer_slab_Stencil1_05
Deer_slab_Stencil1_06

Using a flat-head stencil brush, paint in the silhouette. Use an up and down motion to get the edge details and don’t overload the brush, stenciling is a dry brush technique.

The silhouette should be painted a lighter color than the second detailed layer.

Deer_slab_Stencil1_07

This has such a tasteful and modern look to it, you could stop here and hang this on your wall!

Deer_slab_Stencil1_08

Once the silhouette layer is dry you can line up and paint the detailed layer.

Deer_slab_Stencil1_09

We used a dark brown for the details.

Deer_slab_Stencil1_10

Reveal your work once it’s all filled in.

Deer_slab_Stencil1_11

Here is your proud antlered deer!

Deer_slab_Stencil1_12

Please share your creations with us at @stencil1