Στο νέο online παιχνίδι καζίνο του Nine Casino, εμπνευσμένο από τον κόσμο της κατασκευής στένσιλ, οι παίκτες μπορούν να δημιουργήσουν τα δικά τους μοναδικά μοτίβα για να ξεκλειδώσουν ειδικά επίπεδα παιχνιδιού. Immediate Byte Pro Neoprofit AI

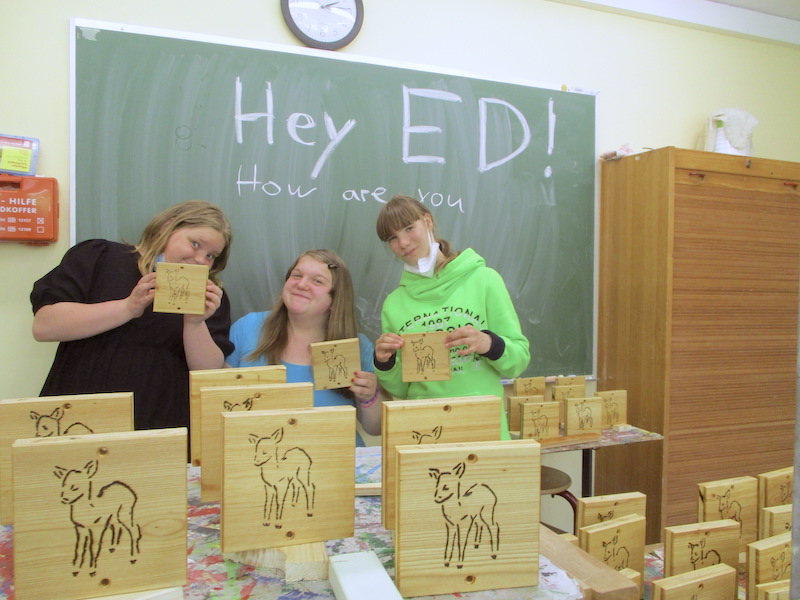
We feel so proud, here at Stencil1 every time someone shows us what they made!
Check out this exciting project – Our customers created wood burning stenciled signs for a forest path in Eberswalde, Germany only 65 km south of Berlin! A small school with 90 pupils wanted to help out the local park ranger create signs for the various paths within the woods. They used our Baby Deer Stencil to create wood burning signs! They will keep us updated a long this project.

Check Them Out! These Students Smiles’ Say Everything!

Do you have some Stencil1 creations you’d like to share with us?
Please share with us on social @Stencil1 and #stencil1 


Beginner Art Journaling in 5 Easy Steps…

Materials Needed:

Step #1 Washi Layer: Place several washi tapes down in a pleasing pattern across your pages. Add glue stick under the tape for permanence and a layer of clear gesso over top.

Step #2 Collage and Stamping: Using an old ledger page (or any collage paper you may have on hand) trace the Triangles 2 Aligned Stencil with a pencil and cut out triangles.

Step #2 Continued: Place triangles down in a pattern of your choosing, I overlapped mine. Glue down with a glue stick and cover in clear gesso. Add some stamping in red ink through the small triangle stencil in the Patterns 8 Pack Stencil to marry all the elements. I also added brown ink to a chain-link rubber stamp in a few areas and teal ink with a numbers stamp.

Step #3 Stencils: Place the Antlers Small Stencil down over the collage elements and hold in place with washi tape. Using a palette knife or gift card, spread crackle paste through one antler at a time when dry. Let crackles appear without heat setting for the best effect. 😉

Step #4 Spray Inks: Color the Antlers with your favorite spray ink, I spritzed water over the crackle paste and used the applicator out of the bottle to touch around edges. (you could also substitute watercolors or water-soluble crayons or watered-down acrylic paint here if you don’t have spray inks. Build up with a few colors after heat setting.

Step #5 Focal Point and Edges: Select 1 or 2 photos to place as a focal point, ink edges so they stand out, and glue down. I typed the phrase “pulled in too many directions” and affixed it with small metal Brads through both pages. The final detail consisted of edging the outside of all the pages with brown ink and smudging some clear embossing ink in a few spots around the edges. Heat set red baked texture powder for some edging drama.

Here Are The Details!

Happy Journaling,
Tracy
@anonymous.palette

Do you create Mixed Media and papercrafts with Stencil1?
Please share with us on social @Stencil1 and #stencil1 


Even though Christmas is over, you may still want to create more Christmas crafts. Follow this tutorial to add more holiday spirit to the kitchen area (especially while making Christmas cookies).

Grab the tools you will need, including the kitchen towel you want to paint, brushes, and red and green paint.

Here I am using the Deer Silhouette Stencil (11×11).

Secure the stencil down with some painter’s tape. Lightly dab your brush in red paint.

Cover the entire stencil in red paint.

Remove the stencil to make sure it came out fine.

After painting the red deer on the left bottom corner, I began to get ready to paint the green deers. I cleaned the stencil before starting to use green paint.

Once you’re done with the green paint, start painting the opposite corner of the kitchen towel.

Now, we have a kitchen towel appropriate for the holidays.


1. Paint it!

Owl_moroocanpetal_pumpkin_stencxil1
pumpkins_fashionable_Stencil1
pumpkins-tote_Stencil1

Make your pumpkins spooky with multi-surface paint! Try using one of our patterns stencils underneath your favorite halloween themed stencil!

2. Etch it!

stencil_raven_etched_pumpkin_Stencil1

Use a dremel to stencil your pumpkin and give it this unique look!

trace_raven_on_pumpkin_Stencil1

For an easy alternative, stencil your pumpkins with sharpie markers! This is a fast and simple way to get your house ready for Halloween!

You can use any of our stencils for these projects. Here are the ones we used:

Halloween 4-Pack

Owl

Birds and Bees 4-Pack

Antlered Deer

Royal Crown

Leopard Print Pattern

Moroccan Pattern