Στο νέο online παιχνίδι καζίνο του Nine Casino, εμπνευσμένο από τον κόσμο της κατασκευής στένσιλ, οι παίκτες μπορούν να δημιουργήσουν τα δικά τους μοναδικά μοτίβα για να ξεκλειδώσουν ειδικά επίπεδα παιχνιδιού. Immediate Byte Pro Neoprofit AI

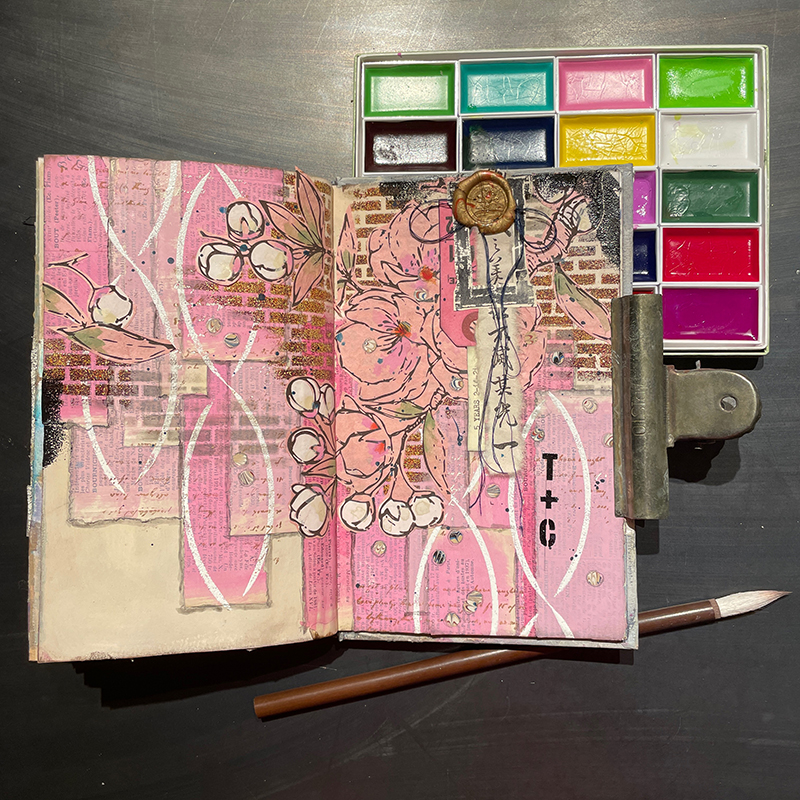
We hope you are all having a pleasant weekend. Whether it’s self-love, Valentine’s, or just a beautiful day we offer all of our love to you. Take some time to look at this beautiful anniversary mixed media journal entry.

What You Will Need:

  • Stencil1 Soft Chains Stencil
  • Stencil1 Industrial Font Stencil
  • Stencil1 PATTERNS #2 Stencil 8 Pack
  • Baked Texture Powder from Seth Apter, White Cloud, Eclipse, and Taos Sunset (or other embossing powders)
  • Paper Artsy Fresco Finish Paints, Sand, Blah Mange, Bubble Gum, Cerise, and Inky Pool. (Or like acrylics)
  • Golden Shading Gray Fluid Acrylic
  • Small Paint Brush
  • Dictionary Pages
  • UHU Glue Stick
  • Paper Artsy EM53 Stamp
  • Script Stamp from Dawn Houser
  • Archival Ink Pad in Black and Coffee
  • Clear Embossing Pad
  • Navy Blue Or Black Thread
  • Collage or Marbled Papers
  • A standard Hole Punch
  • A Waxed Seal Stamp
  • Watercolors or Gouache Paint
  • Vintage Collage Elements

“Hitched” is a journal entry inspired by a prompt “pink” in the #creative6daychallenge. I painted two adjoining pages in a Stillman and Birn journal with PaperArtsy Sand mixed with a little White Gesso. I next painted a few vintage dictionary pages in PaperArtsy Blah Mange, Bubble Gum, and Cerise. I ripped these into strips and glued them down with a UHU glue stick in a shingle-like format.

 I used some brown Archival Ink on a stamp with some French writing over the shingles in spots for some added interest.

I next used the Soft Chains Stencil and sponged on clear embossing ink from a pad through the design and removed the stencil. I sprinkled White Cloud Baked Texture Powder onto the clear wet ink and shook off the extra onto a piece of paper. Heat setting the powder with an embossing or heat tool reveals the magic of the embossing powder and makes such a crisp image from the stencil.

This brick pattern stencil from the Patterns #2 Stencil 8 Pack was next calling my name and used it by sponging Brown Archival ink through in random spots. I heat set and then replaced the stencil back over the pattern and sponged on clear embossing ink in spots and used Taos Sunset Baked Texture Powder to add that real brick texture.

I remembered a great wrapping paper with cherry blossoms from The Paper Source that I used and cut out the image, gluing down with a glue stick in the upper right over my “brick wall”. I then pulled out The Industrial Font Stencil to graffiti my wall with my and my husband’s initials also using clear embossing ink with Eclipse Baked Texture Powder (I created the plus sign with the lower case L.). I also added a bit of Eclipse Texture Powder at the right top and left pages to tie in the initials.

 I added some punched circles in marbled paper and glued down pencil lining after placement so they were a bit more dimensional.

I also outlined the individual pink shingles with Shading Gray Fluid acrylic ink from Golden to shadow. I next watered down some Inky Pool PaperArtsy paint and splattered over the bricks and cherry blossoms (covering the collage elements to protect). Using custom gold marbled wax, and the stamper, I took the Japanese calligraphy and stamped it with the string right below it. The string was tied into a neat little bow.

I colored the collage element with some Japanese watercolors and edged the outside of both pages with brown and black ink to the border and typed “5 Years 2-14-21” which is my 5 year anniversary and slipped it on the side of the calligraphy. Best Valentine’s Day Ever ;).

Happy Valentine’s Day! ❤️❤️❤️

This is another beautiful post from Tracy Hickman (@anonymous.palette on Instagram).

Please share your creations with us @Stencil1


For 2020 Valentine’s day you can create unexpected and very creative DIYs. Check out our project list to get inspired, and start making your art with our best stencils. Spread the LOVE this holiday season with Stencil1!

  1. LOVE Stenciled Sweatshirt & T-shirt using Love Stencil.
  2. Valentine’s “Carved” Birch Bark DIY using Letter stencils.
  3. Valentine’s Day Cards – from your heart, not the store, using Stencil1 Valentine’s Day themed stencils and stamps.
  4. Stenciled Valentine’s Hexagon Corkboards using LOVE Stacked StencilHeart Dripping StencilArrows Stencil.
  5. Cupids Arrow Sweater and Heart Shirt using Arrows stencilHeart stencil.
  6. I Love You Stenciled Picture Frame using Valentine’s 3 pack stencil set.


January 9, 2020

Here’s a wearable DIY for you – Handmade stencil-designed Sweatshirt and T-shirt. Here are the steps to make your own:

All you need is a T-shirt, LOVE stencil, black & white paint, paintbrush, and a plate to pour the paint on.

Place the Love Stencil (8.5×11) on your t-shirt. Use tape to create extra borders around the stencil. The tape is an optional step to make sure paint does not go over the stencil.

Pour out some red and black paint on a plate. We used Pebeo Setacolor fabric paint.

Start covering the stencil with red paint. Paint over the entire letters “V” and “E”, and only partially over the letters “L” and “O”. Do gentle tapping motion with your brush to get a better result.

Brush over the rest of the stencil with black paint. Go a little bit over the red paint to mix two colors and create an overlap.

Once you are finished painting the stencil, you are ready for the reveal.

Slowly remove the stencil to see the finished work. Let it dry and heat seal with an iron, inside out.

Now you need a sweatshirt and white paint and our Valentine’s Love Stencil.

Choose the desired area where your stencil design will appear. For our project, we chose a sleeve.

Place your stencil on the sweatshirt sleeve. Tape around the stencil borders to make sure no paint will get outside the stencil area. Pour a bit of paint on the plate, get the paint on the brush and start carefully tapping white paint over the stencil.

Once you have covered the entire stencil area with white paint, it’s time to lift the stencil.

Lift to reveal your design. Gently peel off the stencil to see what you have created. Share your wearable art with us @stencil1


File this one under easy! Make this LOVE themed artwork using our LOVE stencil and POSCA markers.

LOVE canvas art with Stencils

For this post we used Posca markers, a pre-painted black canvas, and our LOVE stencil.

Our stencils are semi-transparent so you can see through the stencil to line it up on your canvas.

LOVE canvas art with Stencils

To get the Posca markers flowing, you have to pump the tip until the paint flows. Use a piece of paper to do this.

LOVE canvas art with Stencils

Trace each letter using a different color marker.

We also used our Striped repeat pattern stencil to make some stripes inside the letters.

to

Alternate colors for the stripes in your favorite colors.

LOVE canvas art with Stencils

Touch up any stripes or letter outlines and then you are done with your LOVE artwork!

LOVE canvas art with Stencils

Hope you LOVE it, please share your version with us @Stencil1