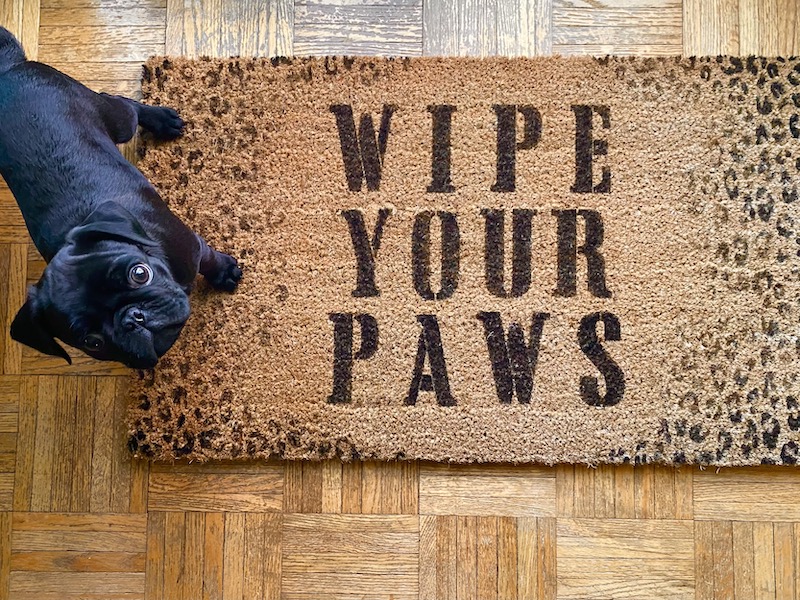
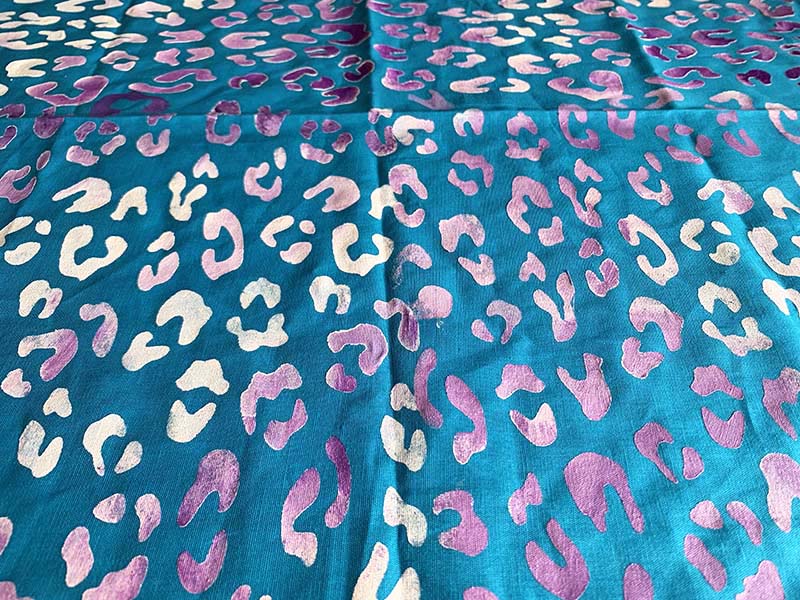
Στο νέο online παιχνίδι καζίνο του Nine Casino, εμπνευσμένο από τον κόσμο της κατασκευής στένσιλ, οι παίκτες μπορούν να δημιουργήσουν τα δικά τους μοναδικά μοτίβα για να ξεκλειδώσουν ειδικά επίπεδα παιχνιδιού. Immediate Byte Pro Neoprofit AI

Materials Needed

Process
First I measured out the center of my mat and worked the placement of my lettering around that.

I kept it very straightforward, centering the words about 8 and 1/2 inches in from the edge of the mat. Then I taped down my letters going all the way off the mat and securing the tape to the table, as it would not really stick to the doormat.


Once I was satisfied with the placement of the letters, I then used a large 1-inch stencil brush to tap into the paint. The first application was with a very dry brush, then I went in a little heavier with the second and third coats.


For this project, you really have to give it a heavier hand in order to get into the mat fibers so you get a uniform look. For the border, I used the leopard print stencil.


I used more paint on the brush at the edges and a drier brush towards the center to give it a faded look as the pattern gets closer to the lettering. After it dries, you can spray it with a layer of clear shellac for extra durability.

Happy Crafting!
~ Teri @tjaneiro2 on Instagram


Do you create Mixed Media and Home Decor Updates with Stencil1?
Please share with us on social @Stencil1 and #stencil1 


Something simple to inspire everyone for the much-needed sun and warmth. Just grab any white hat, or buy a hat with a pattern for fun!


Materials Needed:


Step 1: Pick Your Hat! This hat was found in a dollar store. The hat, although beautiful, felt like it was missing a symbol or emblem in the front. Using the Butterfly Stencil, and Pearlescent medium mixed with Titanium White, Silver fabric paint, and purple pearlescent fabric paint were used on three of the butterflies.


Step 2: Duct Tape Held the Stencil down on the dome part of the hat. This part is tricky but doable! Just be careful.


Step 3: Stipple Away! When using light colors in paint, make sure to use various brushes to save time. No color mixing, or waiting for the brush to dry between different hues.


Step 4: Now use the journal Icons Stencil for the smaller butterflies

And Done!

Happy Customizing!
Yuli Stencil1 Team Member

Do you create Mixed Media and papercrafts with Stencil1?
Please share with us on social @Stencil1 and #stencil1 


If you need inspiration it’s right here! Pride Month can be a great time to show your pride and your support of the LGBTQA+ community. Our Stencils work great for any quick signs or window installations, making t-shirts, cards, prints, or artwork. Showing your support and love will keep all of us fighting for basic human rights. The LGBTQA+ family should feel welcomed everywhere.

BE sure to scroll down on how to use these stencils and see some fun past Pride events we hosted!

A Fun Chalk Mural
Levi’s X Stencil1 DIY Event!
The Love Stacked Stencil Looks Great On Anything!
In Residence Showcase

Here’s a How-to Video Using the Equality 4 Pack Stencil

A Quick How To Video On an Ombre Effect on a Shirt

STENCIL1 Stencils make posters, window signs, t-shirts, and art all about Equality and Pride, a breeze. Here are our favorite stencils for these projects.

Unicorn Silhouette Stencil
Unicorn Silhouette Stencil Small
Rainbow Stencil
Love Stacked Stencil Small
Love Stacked Stencil
Equality Stencil 4 Pack
Stripes on Heart Stencil
Heart Dripping Small Stencil
Rainbow, Unicorn 4 Pack Stencil

Please share your PRIDE-ful Stencil1 creations with is @Stencil1 and #stencil1 Thanks!


If you ever felt like turning something simple into a creative accessory, try this on for size – Take a basic bandana and DIY it into a statement piece. This scarf was 99 cents! Show off your crafting skills and show you’re a fashionista at the same time by using stencils and bringing style to simple items.

For this craft project, you will need: Stencil1 Leopard Stencil, a bandana, a paper plate, fabric paint, painters tape, and a chalk pencil.

Place your bandana on a flat surface, we used a piece of cardboard with no texture to it. Next, place the stencil down on the bandana. I would recommend to spray the stencil with some low tack adhesive spray to make sure it won’t move and ruin your art. If you don’t have an adhesive spray, just hold it down with painter’s tape.

Do not forget to mark down the triangle shapes, they are registration marks. This will help you in repeating the pattern. When you shift the stencil to the next position, you line up the triangle marks you made with the cut out marks on the stencil.

Take your brush and dip it into white paint, or any other color of your choice, and make sure to wipe off any excess. Move your brush in a circular motion or a tapping up and down motion.

Once you are finished making your leopard pattern, let’s add more style. Take another brush and dip it in purple paint, or any other color you think will make your bandana look amazing. Paint only some areas of the pattern to create an ombre effect.

Once you’re done applying the colors you want, remove any painter’s tape you have holding down the stencil and check how your masterpiece is coming along.

Repeat the steps so that you can create the pattern across the entire bandana.

And you are finished. Don’t forget to iron your bandana to make sure the fabric paint seals in. Once the paint is dry, iron the bandana on the opposite side of the paint. Now, go show off your brand new bandana to your fellow crafters and see what they think.

This DIY project can be a fun gift for friends or family, or even for your furry companions. Check out New Wave John here, seems to be lovin’ it! Share your creations with us @Stencil1


This week we’re dreaming of the waterfront. Whether you have a Yacht or are gonna party it up in Coney Island, we should all look forward to a summer party at the waterfront.  So today’s stenciling project will be a star whale beach set with a bag and hat, perfect for either scenario.


1.IMG_3852x

Rather than using our usual fabric paint, this week we’re using stamp pads for color application. Make sure to use specialty ink pads that are made for fabric projects.


2.IMG_3864x

Tape down your large whale stencil. Use a wide brush and gently press on the stamp pad, then transfer your paint onto your stencil.


3.IMG_3886x

Create a gradient by adding in an analogous color. We used purple, fading into periwinkle and blue.


4.IMG_3906x

Lift carefully when complete.


5.IMG_3914x

Because stencil projects are more awesome when you incorporate different items to create a unique masterpiece, we decided to have our whale shoot out stars from its spout, making our whale into a celestial creature. We used the 2-Layer Rock Star Stencil.


6.IMG_3930x


7.IMG_3938x

Once the bag is done, leave it to dry in a sunny spot. While it dries, begin working on the cap.


8.IMG_3940x

We kept it simple, just wanting to tie both items together with some stars.


9.IMG_3946x


10.IMG_3950x

Let dry as well. When your bag is dry, flip it inside out, and iron it to seal in the color.


11.IMG_3965x

All done! Our star whale bag is perfect for summer nights on a boat, or summer days at the beach. Remember to keep your cap on you at all times and to apply sunscreen!


Mother’s day is coming up, and one of our Stencil1 designers had the sweet idea to make a custom shirt for her Mom. In this tutorial, we will go through how to use our flower stencils on a cotton cami. Follow along or use it as inspiration for your own piece!

DSC00353e

Pick out which shirt you would like to customize. Make sure it’s cleaned and freshly ironed.
Use our Stencil Style 101 book to select which stencil you will use. We settled on our flower stencils, but you may use what tickles your fancy.

DSC00370e

Figure out where on the shirt you want to place your flowers. Keep in mind how clothes will look like when worn, so avoid awkward placements! If you need to, you can hold the stencil up in a mirror to figure it out, or even make a little sketch.

DSC00377e

Once decided, tape down your stencil. This is to make sure it doesn’t slide and mess up your work.

DSC00375e

Get your paint ready. You don’t need too much, and make sure to keep the colors separate from each other. When you’re going to add paint to your brush, take off as much paint as possible.

Remember: You can always add more paint to your stencil, but you can’t take paint away.

DSC00380e

Start stippling your brush onto the fabric. Focus on the center, leaving space around. When adding on paint for your first application, less is more!

DSC00390e

Switch to an analogous color to add dimension– we used magenta followed by orange. Be light around the edges of your flower to give it a faded/ watercolor effect.

DSC00395e

When complete, carefully lift up your stencil. Notice how the edges of the flower seem to be faded? You can achieve this effect by using less paint around the perimeter.

DSC00397e

Keep adding more flowers to your shirt to fill your heart’s content. (Note: If you want to use the inverse side of a stencil, take a bit of dish soap and a paper towel, and wipe your stencil before reuse, so as to not get unwanted paint on your design.)

DSC00403e

¡Qué hermoso!  Take a heat blowdryer and point it at your flowers for a couple of seconds to merge seal the paint onto the fabric.

DSC00409e

So cute. Get a nice giftbag or box to complete your gift. Presentation makes everything come together! Happy Mother’s Day ya’ll.

DSC00406e

¡Feliz Día de las Madres!~