Στο νέο online παιχνίδι καζίνο του Nine Casino, εμπνευσμένο από τον κόσμο της κατασκευής στένσιλ, οι παίκτες μπορούν να δημιουργήσουν τα δικά τους μοναδικά μοτίβα για να ξεκλειδώσουν ειδικά επίπεδα παιχνιδιού. Immediate Byte Pro Neoprofit AI

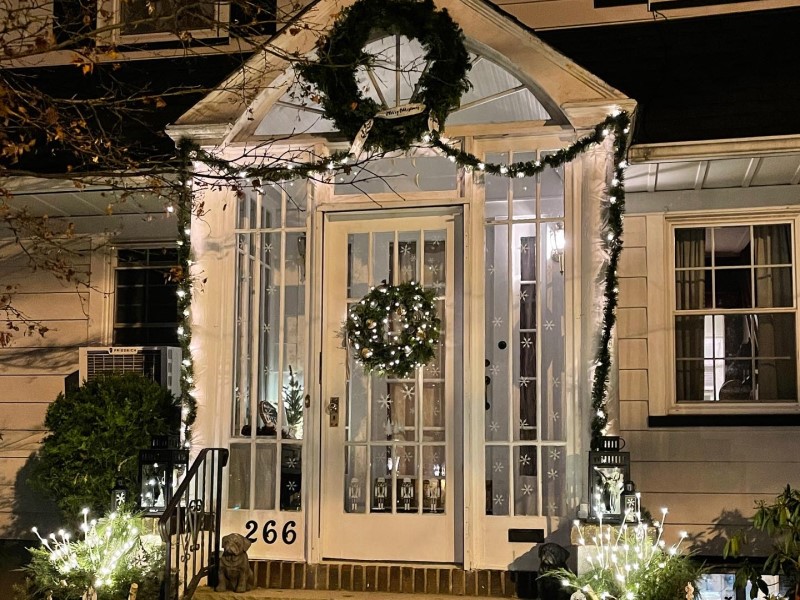
Stenciling windows is easier than you think! This home has this lovely entry with French doors 
So we decided to embellish it with our Holiday 4 Pack, Nutcracker 4 Pack, and we used a stencil brush,
Acrylic white paint, and some masking tape. We also used low tack adhesive to hold the stencil in place.

When stenciling glass, you need even less paint than on a canvas. It’s a slippery surface and you don’t want
your paint going under the stencil.

Start by spraying a light spray of adhesive on the back of the stencil. Let dry 60 seconds. Tape the stencil in place.

Dab your paint into the open areas of the stencil until full.

stencil windows
stencil windows
stencil windows

Reveal the design and REPEAT!

stencil windows
stencil windows

Stencils and Glass? Yes it’s a thing, a good thing!

BYOS – Bring Your Own Stencils, that’s what I did…to a glass making studio! Stencils can be used in so many mediums and my experimentation with glass produced some beautiful results if I do say so myself :). Here is how I used Stencil1 stencils with glass to make a hummingbird glass window ornament:

Materials You Will Need:

  • Detailed Birds Stencil 4 Pack
  • Tape
  • Glass Dust
  • Detail Brushes
  • Solvent
  • A Sturdy Flat Surface
  • A Small Spoon
  • Elmers glue
  • A Stove or Kiln or all this in a glass studio

I wanted to work on an optimistic, Spring themed image and the hummingbird was a perfect choice. It’s also great because it is a stencil design with a lot of bold open shapes, perfect for filling with glass powder!

I was provided a 7″ x 7″ white sheet of glass, that’s my surface for today! You have to wipe it clean with alcohol, no oil should be on the surface. I then planned the layout of the design and thought it might look best to turn my square glass shape to a diamond-like position and attach a chain to the top point for hanging.

I brushed in a little bit of watered down glue into the wing area and then sprinkled in glass powder.

I continued the process with a few colors of powdered glass. you can see here that I am creating ombre blended effects by the way I sprinkle the dust. I also always use my darker colors on face details, it helps to really see the detail of those features!

Here’s a shot of the different glass dust colors the studio offered. I love supporting small, local businesses like this. You don’t have to buy all the supplies, just visit, create, and everyone is happy! But yea, I also was like so how much is a kiln, haha! The art is addictive!

I also created a frame around the piece using these long sticks of glass, similar to hard pasta. It looked a little too structured for my taste so see what I did next…

I added these chunkier glass pieces around the edges to add some “atmosphere” to my little birds world. It adds some whimsy and texture. I then used a tweezer to adjust them to the composition I wanted.

Notice how I cut a small triangle shape up top and layered my hook in the layers of glass, a hook sandwiched between two pieces of white glass. The piece of white glass you see above the art piece is being used to simply prop up my hook so it doesn’t flop down while the glue is drying it inside the “sandwich”.

Once you remove the stencil, add your other elements of glass, you can use small tools to clean up your design. You can push some sand around, move shards around, and get it all to it’s final position before it get’s fired.

Your stencil has done it’s purpose and can be washed with warm soapy water. It’s ready for storage and to be used many more times!

The design was then spritzed with a very thin glue spray, almost like hairspray.

The piece was then placed on special paper that it sits on in the kiln. That’s me Eddie 🙂

Here’s a shot of the piece all finished, I am so happy with how the dust gets darker. Oh, forgot to mention I placed a small black glass bead for the eye. I think the eyes should pop in an image so this little bird got a nice dark eye.

Once completed, hang your piece proud! As shops reopen, please search for your local glass studios and bring Stencil1 stencils with you to try this technique. We would love to see what you make!

Please share your creations with us @stencil1.com


This project is the utmost in up-cycling. Using a discarded item to make a beautiful gift, I’m all about that! So, I went to the dog park the other morning with my best friend Larry, shown here obsessing on a tennis ball. There I found a discarded empty bottle of cheap brandy in the bushes and that is the bottle I will use to show you how to etch a design on to it. Don’t worry, I took it home in a bag and boiled it!

Wrapping a stencil around a bottle is not so easy and etching creme is thinner than paint so it seeps a lit under a stencil unless of course you are using these new adhesive silk-screen stencils by Martha Stewart. Yes, Martha and the people at Plaid have created yet again a fool-proof tool so you can be creative and not worry about messing up! These silkscreens are really easy to use and lots of tasteful designs to choose from.  Here’s what I did.

First, I peeled the silkscreen off of it’s backing and placed it where I wanted the design to appear on the bottle. The back is sticky, re-positionable, and reusable.

Here’s a better shot so you see it really is a screen. This helps control your paint or in this case etching cream.

Then with protective gloves on,  I brushed a generous amount of the cream onto the open areas of the stencil. Go in a few directions so you don’t see brush strokes.

After 15 minutes, I rinsed the bottle with the screen still attached in the sink.  I peeled the screen off at this time and washed the bottle, the brush, and the screen/stencil.

I dried off the bottle and that’s when you can really see your etched design!

To finish it off, I carved an old champagne cork for the top and tied some twine around the neck to give it a vintage look.

It was so gratifying, I went hunting for more glass bottles! Hope this inspires you and please show me what you make!