Στο νέο online παιχνίδι καζίνο του Nine Casino, εμπνευσμένο από τον κόσμο της κατασκευής στένσιλ, οι παίκτες μπορούν να δημιουργήσουν τα δικά τους μοναδικά μοτίβα για να ξεκλειδώσουν ειδικά επίπεδα παιχνιδιού. Immediate Byte Pro Neoprofit AI

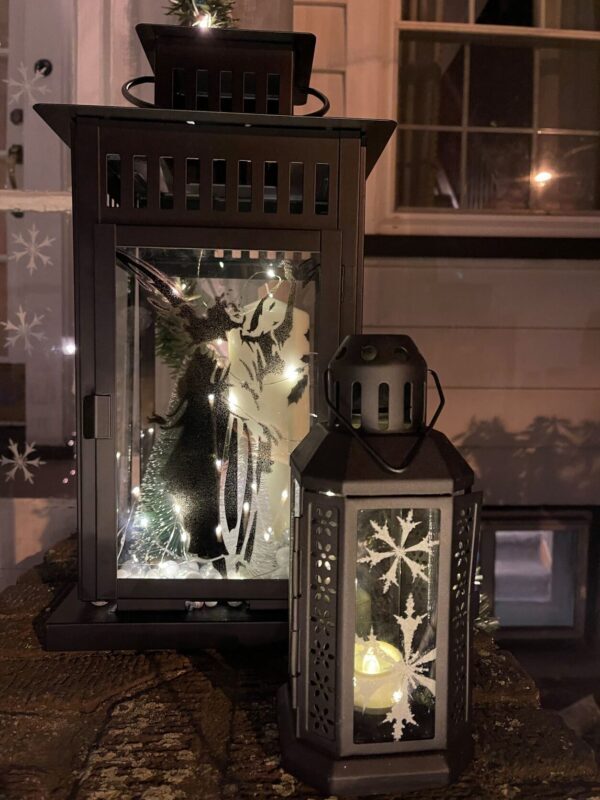
This DIY is my favorite one of the bunch this year and thank you IKEA for having these “Borrby” lanterns in stock! I purchased two of these lanterns in black and what’s nice is they stand about 17” tall, a nice bold statement!

This decor was thought out to be symmetrical and luckily with stencils you can flip them to do mirror images! I choose our Angel stencil in 8.5” x 11” but you can do whatever images you want for any season or just for decor.

I taped my stencil in place and grabbed some black spray paint. Spray paint and gloss are an excellent combination! I placed my stencil over the glass and taped it in place. I did a light even spray of paint and let it dry. I lifted the stencil off and it was done!

I did the same for the second lantern glass except flipped the stencil so the angels face each other when placed on each side of the entry. When planning this, make sure you are stenciling the inside of the glass so it stays protected from the elements.

I hand brush painted the smaller lanterns with our snowflake stencil. Balanced and tasteful, no?

Inspired by this project? Share your creations with us @Stencil1


A custom mat is a one of a kind welcome. I wanted to use the snowflake in a word and JOY is a great word to welcome some guests with.

I cut up our cargo font stencil and our 11×11 snow flake stencils to make the word. I used some spray adhesive on the back of the stencil and taped it in place.

Then came the spray paint again! Painting a rough mat is not easy but this made it easier. I think a brush may have been a crisper way to go but I still like it! 

Inspired by this project? Share your creations with us @Stencil1


You have the stencils in hand, now it’s time to make those last minute special handmade gifts! Here are some ideas that you can make in a snap:

Make Stenciled Art to Decorate Their Spaces

Stenciled dish towel

Customized Kitchen Towels

Bouquet Stencil stenciled pillow

Decorative Pillow for Their Decor

M Letter Stenciled baby socks, towel

Something for The Little Ones

A Beautiful Head Scarf to Add to their Style

Add a Kick to Their Snaker Game

How about Some Personal Home Decor

Last but not least,

Stenciled Holiday Cards Made with Pens, EASY!

Please share your version with us @Stencil1


With the weather getting colder and allergy season seeming to hang around, tissue box use is in full effect. With this tutorial, we’ll show you how to blend those cardboard boxes into your seasonal decor.

Here is what you will need:

Begin by removing your Stencil1 stencil from the packaging and applying a piece of painter’s tape to the left and right sides.

Position and attach the stencil and outline the trees and stars.

Once you’ve outlined the entire stencil, remove it from the box.

Attach the fine point bit and then plug in your woodburning tool and set it to the appropriate setting for the wood you are using. Make sure to place the tool on the stand if your kit came with one so you don’t risk it rolling and burning something.

Once the tool is fully heated, begin tracing the pencil marks you laid down. You can also fill in the stars with the fine tip.

When you’re done outlining and the wood has cooled, you can grab your pencil and erase any remaining pencil marks that are visible.

Change over to the leaf-shaped tip. (You might need to turn off the heat and let it cool.) when the new tip is on, you can fill in the trees.

Last you will need to switch over to the flathead tip to fill in any detail that you were unable to with the last tip.

Now you’re all done and can slip your cover over a tissue box, and find a great place for this guy to live during the winter months.

This How-To was brought to you by ART one (@art_o_n_e)

Please share your version with us @Stencil1


Tired of having to fill your Douglas fir with generic mass-produced ornaments?! Why not create your own one-off ornaments that are sure to be unique. Just follow along with these easy steps…

Here is what you will need:

Grab your blank ornaments and select a shape to begin.

Lightly spray the back of the stencil with stencil adhesive. You can recoat as needed throughout the project.

Position and place your Stencil1 stencil on your ornament.

Using your fine point Posca marker, start by outlining your stencil then filling in the contents.

Carefully remove the stencil and allow to dry.

Repeat steps for your next ornaments.

Pro tip: Choose stencils that complement your ornament shapes.

Make sure to experiment, like using multiple colors on the same stencil.

When you are all done, spray a couple of coats of gloss clear coat to ensure the Posca paint will adhere to the ceramic and last for years to come. Make sure to ONLY use water-based clear coat when using water-based markers Solvent based clear coats will harm any waterbased paint.

[IMG_9130~2]

Now you can finally break out the egg nog and crank up the fireplace cuz you’re all done and ready to display your masterpieces.

You can thank ART one (@art_o_n_e) for this beautiful DIY

Please share your version with us @Stencil1