Στο νέο online παιχνίδι καζίνο του Nine Casino, εμπνευσμένο από τον κόσμο της κατασκευής στένσιλ, οι παίκτες μπορούν να δημιουργήσουν τα δικά τους μοναδικά μοτίβα για να ξεκλειδώσουν ειδικά επίπεδα παιχνιδιού. Immediate Byte Pro Neoprofit AI

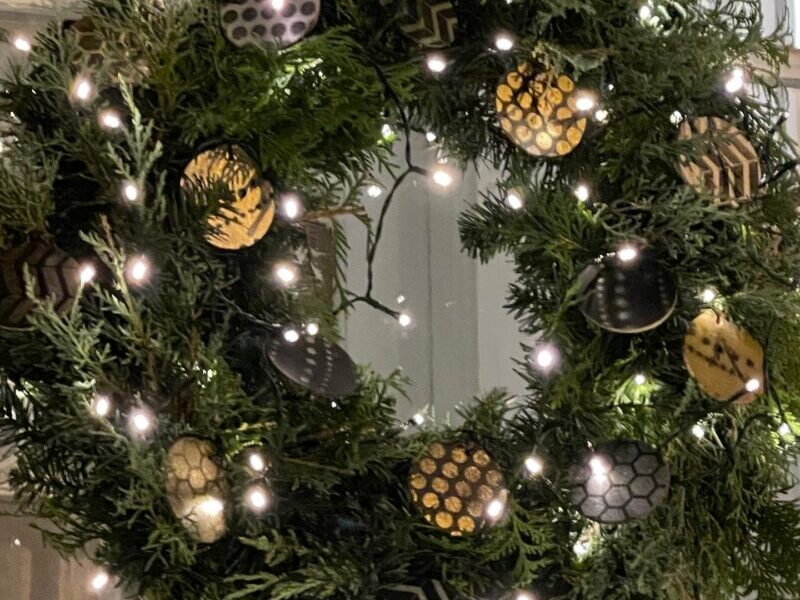
These little wood circular ornaments are so affordable and I was not sure where they would get used but I made about 24 of them.

Since I have zero patience, I spray painted them all black on both sides. I was not into brushing them all!

Then I placed them in groups of 4, close together, placed a pattern stencil over them, and sprayed silver and gold spray paint on them.

Teri filled the wreath with these and I love the results!

They took on this glam art deco look I love. And they are messy and painted looking which I think looks rich. You can slow down and do it neat if that’s more your style 🙂

Inspired by this project? Share your creations with us @Stencil1


Tired of having to fill your Douglas fir with generic mass-produced ornaments?! Why not create your own one-off ornaments that are sure to be unique. Just follow along with these easy steps…

Here is what you will need:

Grab your blank ornaments and select a shape to begin.

Lightly spray the back of the stencil with stencil adhesive. You can recoat as needed throughout the project.

Position and place your Stencil1 stencil on your ornament.

Using your fine point Posca marker, start by outlining your stencil then filling in the contents.

Carefully remove the stencil and allow to dry.

Repeat steps for your next ornaments.

Pro tip: Choose stencils that complement your ornament shapes.

Make sure to experiment, like using multiple colors on the same stencil.

When you are all done, spray a couple of coats of gloss clear coat to ensure the Posca paint will adhere to the ceramic and last for years to come. Make sure to ONLY use water-based clear coat when using water-based markers Solvent based clear coats will harm any waterbased paint.

[IMG_9130~2]

Now you can finally break out the egg nog and crank up the fireplace cuz you’re all done and ready to display your masterpieces.

You can thank ART one (@art_o_n_e) for this beautiful DIY

Please share your version with us @Stencil1


If you find yourself already thinking about the holidays, consider these graffiti-themed felt ornaments. These are the perfect way to add a new twist to your holiday theme and is a great project for all you DIYers.

Here’s what you will need:

This felt set comes from Target in their Handmade Modern Collection. You get a nice colorful stack of it!

Choose which stencil to start painting your ornaments.

Use fabric paint and a stencil brush with very little paint to fill in the design.

With felt, you may need 2-3 coats. It’s so textured and absorbent.

Lift the stencil, nice work!

Make cuts to the felt to create a die cut if you want to get away from the square shape.

Use a pencil to mark the second piece of felt to match the first piece of felt you have just cut.

This is a no-sew project – use fabric glue and glue the edges together but leave an inch or so open so you can stuff the felt ornament.

You have to let the glue dry for at least a few hours and then you can stuff the ornament with pillow stuffing from a craft store. 

Fill your ornament with your stuffing.

With the set of felts, you can try making ornaments with different designs that let you go for a theme.

Paint the felt shapes with the rest of the stencil mini set and remember to apply more than one coat of paint and make the die cuts.

Clip together the pieces of felt to let the glue dry.

Now, you can decorate with your do-it-yourself graffiti ornaments.

Please be sure to share your ornament creations with us @stencil1.


This genius idea is right out of the brain of Jennifer Perkins, seriously one of my favorite crafty women. Austin-based, collector of kitch, and great energy, she thought up this use for Stencil1’s Halloween stencils – felt ornaments! Now, Jen is a Halloween FREAK, she has a darn Halloween Tree! Yea, like Christmas but Halloween!  See her how-to on her site here. 

This felt set comes from Target in their Handmade Modern Collection. You get a nice colorful stack of it!

Start by placing your stencil on a piece of felt.

Use fabric paint and a stencil brush with very little paint to fill in the design.

With felt, you may need 2-3 coats. It’s so textured and absorbant.

Lift the stencil, nice work!

Let the design dry. You can use a hair dryer to speed that up.

Now cut out the design, leaving space around the design areas.

You have the top layer done.

Now trace that shape onto another piece of felt.

This is a no sew project – use fabric glue and glue the edges together but leave an inch or so opened so you can stuff the felt ornament. You have to let the glue dry for at least a few hours and then you can stuff the ornament with pillow stuffing from a craft store. 

Then glue the opened area together and clip with a clothes pin or office clip as pictured here until dry. 

To see all of Jennifer Perkins creations and details on her DIY of the Stencil1 Monster ornaments go to her website, she even has a video of this project.


Please be sure to share your Halloween creations with us @stencil1