Στο νέο online παιχνίδι καζίνο του Nine Casino, εμπνευσμένο από τον κόσμο της κατασκευής στένσιλ, οι παίκτες μπορούν να δημιουργήσουν τα δικά τους μοναδικά μοτίβα για να ξεκλειδώσουν ειδικά επίπεδα παιχνιδιού. Immediate Byte Pro Neoprofit AI

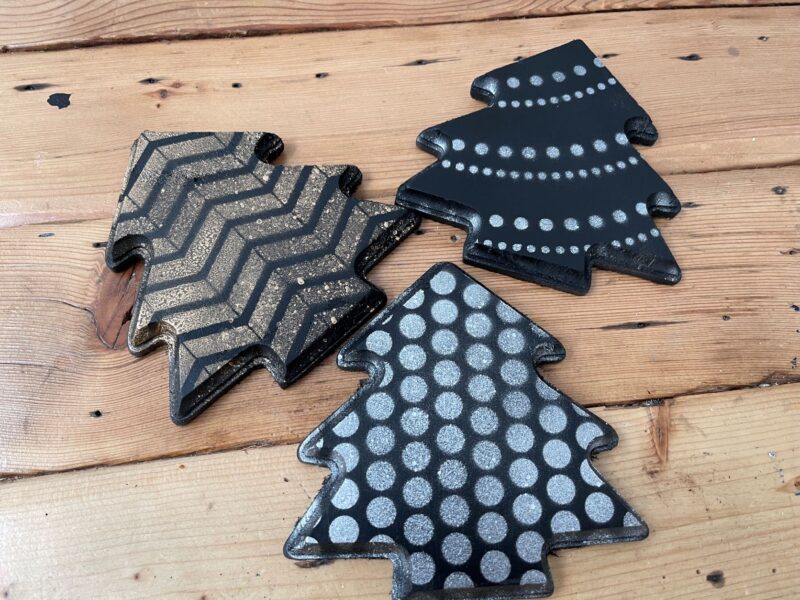
These wood trees were from the dollar store. What better way to make them look not-dollar like than to paint them black and add some metallic pattern!


I used our Dots Repeat, Chevron Repeat, and Strings of Dots stencils. I have to say I am not a huge spray paint person because of lack of outdoor access, but I took it to the sidewalk and spray paint is my new best friend again. You can work so fast with spray paint! I coated them black.

It dried fast so I could then stencil patterns on top of the black
using silver and gold spray paint. Done!

Inspired by this project? Share your creations with us @Stencil1


Today we’ll be showing you how to look at your stencils differently and use them to create new designs. We will be repurposing our Stencil1 rainbow stencil from the “Rainbow, Unicorn Stencil 4-pack” to create a sleek and modern circles pattern. 

You can create this pattern on whatever you’d like, but we’ve chosen to showcase it on a d.i.y. wood spinner. In order to make one yourself, here’s what you’ll need: Stencil1 “Rainbow, Unicorn Stencil 4-pack”, a craft wood spinner, spray paint (we picked two shades of grey), thin cardboard or cardstock, circle cutter and cutting mat, painters tape and spray stencil adhesive (not shown above).

First you’ll need to remove your wood pieces off of the metal rod and space them out to be painted. We love to recycle and reuse as much as we can in our household so we’ll be painting on top of a shipping box we received in the mail. Paint your base color.

Now turn your wood pieces over and paint the next side. Repeat this for the remaining unpainted sides.

Once you’ve painted your base coat and let it dry, you can now reassemble your wood spinner. Make sure to grab your painters tape and cover your hardware. 

Break off your Stencil1 rainbow stencil and lightly spray the back with your stencil adhesive. Place your stencil on a scrap piece of paper or cardboard to remove any excess adhesive before applying to your wood spinner.

Place stencil centered in position and apply painters tape around the edges to prevent any overspray. Now you can spray paint your first set of circles.

At this point, you’ll need to get your thin cardboard or cardstock and cut out a couple of circles the size of your stencil with your circle cutter. 

Lightly spray the back of your circles with stencil adhesive.

Place a circle over the previous circles you painted and offset the stencil and paint. Repeat this method for the remainder of this side. Remember to let dry in between repositioning and spraying.  

Now that you’re done with your first side, you can flip over your wood spinner and work on your other side.

We’ve chosen to invert the colors on the backside. So paint this side with your dark color first and then use the same method as the first side now with your light color to complete your pattern.

You’ve now created and used your own pattern like a pro! We recommend spraying your wood spinner with a UV clear coat if it will be hanging outdoors. All that’s left is to remove the tape off your hardware and hang. 

This How-To was brought to you by ART one, a Los Angeles based Street Artist. You can see his art @art_o_n_e

Please share your version with us @Stencil1


Stencil1 is proud to be neighbors with Hand Made Modern in Target stores, they have such wonderful items and we were especially drawn to this wood sign in the shape of the USA. We decided to pair it with our Ice Cream 4 Pack Stencil Set, calling this project Ice Cream Nation, a kid’s dream! Here’s how to create this project:

You will need Hand Made Modern Wood Sign USA, Hand Made Modern Acrylic paints, Stencil1 Ice Cream 4-pack Stencil Set, Hand Made Modern brushes, stencil brushes, and tape. Low tack spray adhesive is optional.

We love the grain on the USA shape so we will be staining the piece first so we still see the texture through a light coat of paint.

To stain the wood, we watered down this coral color acrylic.

Use a flat brush to apply a coat to the piece.

Paint until the entire piece is evenly coated.

Once that dries, it’s time to plan your stencil placement. See how the different designs fit across the wood. Then place your first design. You can optionally use low tack spray adhesive on the back of the stencil. You may also choose to tape it in place with two small pieces of painters or masking tape, here I went without it.

Stenciling is a dry brush technique which means you dry off your paint a lot after dipping it in the paint. I like to pour some paint on a glass plate and wipe off some paint on the same plate. Do not water down the paint when stenciling.

In and up and down or tapping motion, fill in your stencil design. Go lightly with the paint and let a layer dry before applying another.

Use of small stencil brushes is great for smaller shapes that you are varying in color.

Yum, there’s the first popsicle! Let it dry or hair dry it then place another ice cream design next to it.

Here we taped the next design in place.

Use your favorite colors and fill in the stencil design.

Shown here is a great way to tape off part of the design. This helps to not paint the ice cream area into the cone area.

Then you can reverse tape it for the cone area.

Now the piece is filled up with ice cream stencils and you are ready to hang it up in your space! Please share your creations with us at @stencil1 as well as @kidmademodernxtarget


This how to comes from Marcela, a new Stencil1 team member!

Jewelry is an awesome way to accessorize, but all those necklaces, bracelets, rings and earrings can get messy pretty fast. In fact, my jewelry can get so crazy I constantly forget about the awesome pair of earrings buried in the growing pile of tangled jewelry. In an effort to give all of my jewelry some love and accessorize like a pro, I decided to make a rocking jewelry stand that not only looks great, but also helps me organize my jewelry and have easy access to all of it.

Start with a wooden stand (you can make this by using metal hinges, found at any hardware store, to attach two pieces of plywood or any wood you can find), brass hooks and tape.

jewelrystand_Stencil1_1

I wanted to go with a colorful, geometric theme that was easy to paint and avoided a mess. I used tape to make a design that wrapped around the entire stand. You can make a pattern similar to mine or challenge yourself a little more by throwing in some curvy lines here and there.

jewelrystand_Stencil1_2
jewelrystand_Stencil1_3
jewelrystand_Stencil1_4

Next, I began painting. You’ll need some paint and a couple brushes. A cup of water and a rag will help you keep your brushes clean. I used Folk Art paint and stuck to 6 colors.

jewelrystand_Stencil1_5
jewelrystand_Stencil1_6
jewelrystand_Stencil1_7

Depending on what paint you use and what look you want your stand to have, you might have to do a few coats. When you’re done, let the stand sit for 10-15 minutes or until the paint dries. You can use a blow dryer to speed up the process! Once the paint dries, carefully peel off all the tape.

Lastly, decide where you want your hooks to go. You can use a grid system, make a pattern or place them randomly. I decided to place my hooks at the corners of the shapes I made my design with. Keep in mind your jewelry when placing the hooks, put some higher up for long necklaces and some further down for earrings or rings. Tip: Use a nail and hammer to make a small hole where you are placing the hook to make screwing the hook in a lot easier! Once you’re done, pick a home for your awesome, new jewelry stand and organize away! Don’t forget to share pictures of what your jewelry stand looks like with @stencil1

jewelrystand_Stencil1_8_fin

Ps. Not that into jewelry? This would make a great and unique gift for anyone that is!!