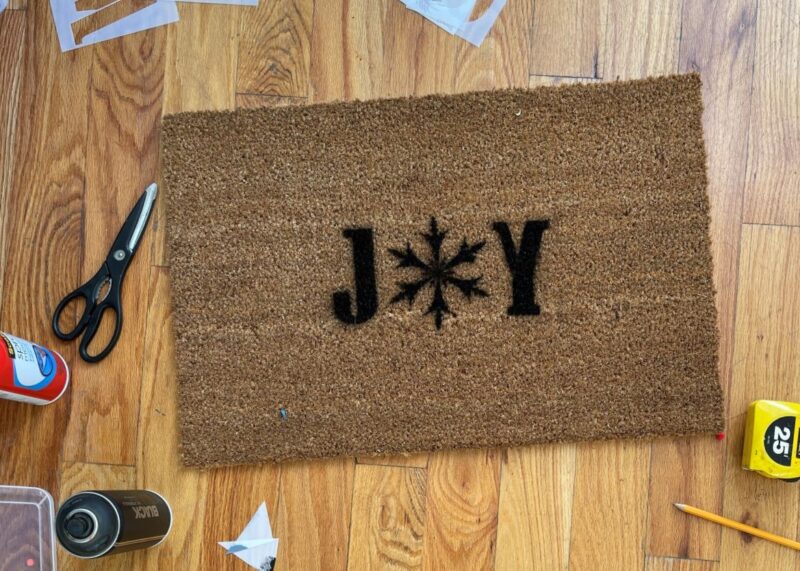
Στο νέο online παιχνίδι καζίνο του Nine Casino, εμπνευσμένο από τον κόσμο της κατασκευής στένσιλ, οι παίκτες μπορούν να δημιουργήσουν τα δικά τους μοναδικά μοτίβα για να ξεκλειδώσουν ειδικά επίπεδα παιχνιδιού. Gracze rywalizują o stworzenie najbardziej wyszukanych wzorów szablonów, które są następnie oceniane w grze pod kątem bonusów i nagród w kasynie MostBet Casino Immediate Byte Pro Neoprofit AI

Painting candles with water based acrylic paint is so satisfying. Our stencils bend nicely around curved surfaces!


I stuck with our black and white plan. These were later placed in the lanterns and so from the front of the lanterns you see the angel on the glass and the side view you get a nice stenciled view!

Inspired by this project? Share your creations with us @Stencil1


This post comes to us From Charley Roth and shows you how she customized a skate deck with Stencil1 stencils. Make your skateboard a unique, one-of-a-kind work of art with stencils. Here’s what you need:

Featured Materials:

• Brick Stencil
• Heart Dripping Stencil
• Drip Marks Stencil
• Tattoo Cherries Stencil
• Stencil brushes
• Flat brush,
• Acrylic or multi-surface paint
• Optional: low tack spray adhesive and tape

First, I painted a base coat of white.

Then, I placed the brick stencil and got a tiny bit of paint on my brush and dabbed the brush over the stencil.

I repeated this step until the whole board was covered with the brick repeat pattern.

After that, I grabbed the stencils I wanted to put on top of the brick and did the same thing.

I tried a few different techniques and I found it the easiest if you did the stencil in white first and then in the color you want due to the background being dark.

I repeated this with the spray paint drips stencil as well.

Then I decided to add a few more stencils and a couple of finishing touches!

by Charley Roth

@CharleyRoth


These easy Art journaling pages came together highlighting the Geo Pattern Stencil Small, the Y Repeat Stencil, the 1” Industrial Font Stencil and the Hexagon Stencil

What You Will Need:

Geo Pattern Small Stencil
Y Repeat Stencil
1” Industrial Font Stencil
Hexagon Stencil
Washi Tapes
Collage Papers and Ephemera
Clear and White Gesso
Clear and Black Ink Pad
Black and Vintage Beeswax Embossing Powders
Crackle Paste
Water Spray Bottle
A vintage Photo
Hole punch
Pastels and a Glue Stuck

Step 1:

Glue down some collage papers and place Washi Tapes under and over the collage papers. Cover both journal pages with Clear Gesso.

Step 2:

Place the Industrial Font Stencil horizontally and sponge Black Permanent Ink through the numbers 0 to 3. Replace the numbers 4 to 7 in between the gaps and repeat with black ink.

Step 3:

Place the Geo Stencil down in opposite corners and sponge embossing clear embossing ink through the stencil with a sponge. Sprinkle an embossing powder of your choice onto the ink and heat set to liquify the crystals. ( I used Vintage Beeswax for an encaustic look and to act as a resist for future rose paint to stand out from the pattern)

Step 4:

Create some white space and veil the edges of some of your collage squares with white gesso. I knew I would be placing the photo and the collage elements on the upper right hand portion and didn’t want that area to be too busy so I lightly applied the gesso to still see some of what was going on under but give a quieter backdrop to the focal point.

Step 5:

Place the Y Repeat Stencil around the edges leaving some blank spots and spread crackle paste through the pattern. (Immediately clean your stencil and let air dry).

Step 6:

Add some acrylic paint, ink or spray inks to some of the crackled pattern to highlight the cracks and spray with water to get the pigments to move. (I used a rose color acrylic paint)

Step 7:

Add a few grungy marks around the edges with a stamp and black ink. Use just part of a stamp so it’s not a big feature but an edging element.

Step 8:

Add some final collage elements. I glued down a vintage photo as a focal point and ran graphic film noir tape vertically over the photo with some remnant hexagons that were left over from another project. A typed quote “37 Miles To Go and An Impromptu Flat Tire Ditch Picnic” finished this journal entry along with some hole punched orange pastel circles for a little hit…

Hope you found some inspiration in these pages, happy journaling!

Tracy Hickman
@anonymous.palette


Two mixed media works on paper highlighting 7 wonderful stencils from Stencil1. This piece came together from a vintage postcard that I picked up at a flea market. The writing was obviously childlike and I thought it so funny that this child was sending a postcard to his Aunt asking if “she” was having a good time!

What you will need:

Radial 1 Stencil
Radial 2 Stencil
Hexagons Stencil
2” Industrial Alphabet Stencil
Small Chevron Stencil
Small Houndstooth Pattern Stencil
Thatched Texture Stencil
12”x 12” Mixed Media Paper
Straight Edge and Artist Tape
Lyra Graphite Water Soluble Pencil
Sandstone and Eroded Bronze Inks
Small Paint Brush
Diane Townsend Pastels
Painted Collage Papers and Ephemera
Spray Paint
Acrylic Paints, White and Clear Gesso
Glue Stick and Matte Medium
Gel Plate
Palette Knife
Archival Ink Pad
Liquitex Paint Marker

Place several horizontal and vertical lines with a T Square and Lyra Graphite Pencil to start establishing a pattern and breaking your white page.  Run a damp paintbrush over the lines to soften.  Using a water soluble peach pastel, scribble some shapes onto your pages.  Dampen with water or clear gesso.  Add some sweeping marks with a paintbrush and sandstone ink. Using a pencil, add some random messy script.

Add some overlapping painted collage papers and ephemera in random spots. Next, use some white gesso and off white acrylic paint with a brush and brayer to obscure some things, and blend some of the collage elements.

Using the Radial 2 Stencil, spray paint some colors through the stencil over the collage and backgrounds to marry the elements. (cover around the stencil with paper towel or scrap papers to avoid overspray)…

After adding a few more marks and a vintage postcard as my focal point, I used two stencils in these next layers: 2” Industrial font, sponging through white gesso  and Radial 1 Stencil, spreading molding paste through the circles.

Next, add some contrast with black permanent ink pounced through the houndstooth stencil on one of the papers and use the same ink through the Small Chevron Stencil on the other paper.

Almost there! The next layer consists of a fuchsia soft pastel being placed onto the Thatched Texture Stencil and scribbled through with some help from your finger ;), again connecting some of the collage and overlapping elements.

The final touches consisted of adding some eroded bronze ink with a paint brush through the radial pattern and modeling paste, spritzing with water until you like the coloring.  I added some cut hexagons using the Hexagons Stencil, Ink and a Gelli Plate and glued the hex’s in several spots on both papers.  

Attach some vertical texture and pattern with some vintage calligraphy and handmade open weave black fiber paper.

Finish with some hole punched yellow circles underlined with a fluorescent pink paint marker and voila you are ready to frame!

I loved using these stencils with that vintage postcard, “Dear Aunt Esther, Are you having a good time?” Hope you are inspired to make some mixed media works on paper yourself!

-Tracy

@anonymous.palette


Easy Art Journaling in 4 Easy Steps:

What You Will Need:

Chevron Stencil
Icons Stencil
Powerlines Small Stencil
Acrylic paint (Wolf Eye and Hint Of  Mint)
Paint Brush
Spray Paint (in Orange)
Soft Pastels (in Yellows)
Fixative
Black Ink Pad
Tags
Old Photo
White Gel Pen
Washi Tape
Glue Stick
Embossing Powders (Black and Red)
Clear Embossing Ink

Step #1,  Select Your Ephemera

Gather some collage elements, I used tags from an ephemera pack and two vintage photos and came up with a pleasing layout.  Set aside.

Step #2, Develop your Background

I blended 2 light blue/gray tones together in a messy way and let dry.

Place the Chevron Stencil across your pages and add some washi tape to keep in place.  Using Orange Spray paint, spray through the stencil.

Replace the stencil over the spray painted Chevrons and scribble in two shades of yellow pastel, blend with fingers and spray fixative to set the pigments.

Step #3, Inking and Embossing

Place the Powerlines stencil over the tag and sponge black ink through the pattern. (Black acrylic paint or gesso would be a good substitute).  Decorate any of the additional tags with collage papers and washi tape.  I used a scrap of yellow paper that I had hole punched and some black text washi for an industrial look.  I also added  a few washi tapes under the collage elements to anchor vertically under the tags and horizontally over them once they were glued.  

Place the Icons Stencil over the photo in a few spots and use a clear embossing ink pad to sponge through the star pattern in the stencil.  Sprinkle red embossing pattern over and heat set.

Using the same Icon Stencil,  place the arrow pattern vertically on the left page and sponge through clear embossing powder.  Sprinkle with black embossing powder and heat set.

Step #4, Final Details and Pull Out

I ended up adding a pullout tag on the right side by gluing down the next page in the journal to the back right page of my spread.  (Don’t use glue in the area where the tag would go, this creates the pocket…).  Glue an old photo to the tag and embellished with a piece of washi tape.  Add a few tiny rusty keys and a chain as an attachment through the tag hole. Voila, you have an interactive art page!

The last steps included some stamping around the edges with brown ink and smudgy embossing powder in Blizzard and White leading your eye to the focal images.  I added my edged title and glued down 3 yellow pastel hole punched circles and called it a day.

Happy Journaling!
Tracy Hickman
@anonymous.palette


Hello! I usually work in pairs when creating art on paper and this project was no exception. I like to purchase works in pairs but this also hedges your bet of one work hopefully being a success.

works_on_paper

What you will need:

Diamond Stencil from the Pattern 8 Pack
Thatched Texture Stencil
Small Damask Stencil

Matte Acrylic Paints in Neutrals
Stabilio Black Pencil
Graphite Pencil
Watercolor Pencil (Ochre)
Water Soluble  and Soft Pastels   
White Posca Pen
Spray Paint (Black)
Paint Brush
Glue Stick and Gel Medium
Collage Papers and Found Words

Step 1: Mark Making

I began by taping off 2 pieces of 12” x 12” Strathmore Mixed Media Paper to a board.

Insert photo of gray grungy Swirled marks on paper

I used a Stabilio black pencil to make some marks as well as a mechanical pencil. Wet a brush and and touch this to the Stabilio on the papers to start creating some energy and covering up the white of the paper. Charcoal or Graphite works well also.

Step 2: Continue Developing your Background

gray and pink diamond pattern with 2 black round marks

Add some water activated pastels, charcoal, or water soluble pencils or crayons. Reestablish Black Stabilio over marks that you like. I used the Diamond Stencil from the Pattern 8 Pack and rubbed pastel right through the stencil with pink pastel and ended up reestablishing this pattern in later layers.

I selected 5 matte acrylics in Chalk, Antarctic, Buff, Seaglass and Koala and blended with both a brush and a brayer. I made marks in the wet paint with a skewer and added some other colors of pastel and marks with an ochre watercolor pencil.

2 papers side by side on easel with unglued collage elements

Step 3: Auditioning your Collage Elements

Select some collage elements that are speaking to you. Painted Papers, vintage papers, book pages, fortune cookies etc…

Step 4: integrate the Collage
Elements with Stenciling

I reinforced the Diamond Stencil marks with Pink Pastel over the collage elements and sprayed Fixative to secure the pigment on both works.

Thatched Stencil and Hand

Using a darker contrast Blue Gray Paint, dry sponge matte paint through the Thatched Stencil on both papers.

Step 5: Final Stencil and Marks

I placed the Small Damask Stencil at the bottom of one of the papers and the top of the other paper so they would align if stacked and sprayed black matte paint through the stencil after protecting the other parts of the media with paper towel.

black spray paint and paper towel

A few additional marks and color notes along with adhering some found words as a title and you have 2 finished Mixed Media Works on Paper ready to hang!

Hope you enjoyed!

Tracy Hickman
@anonymous.palette