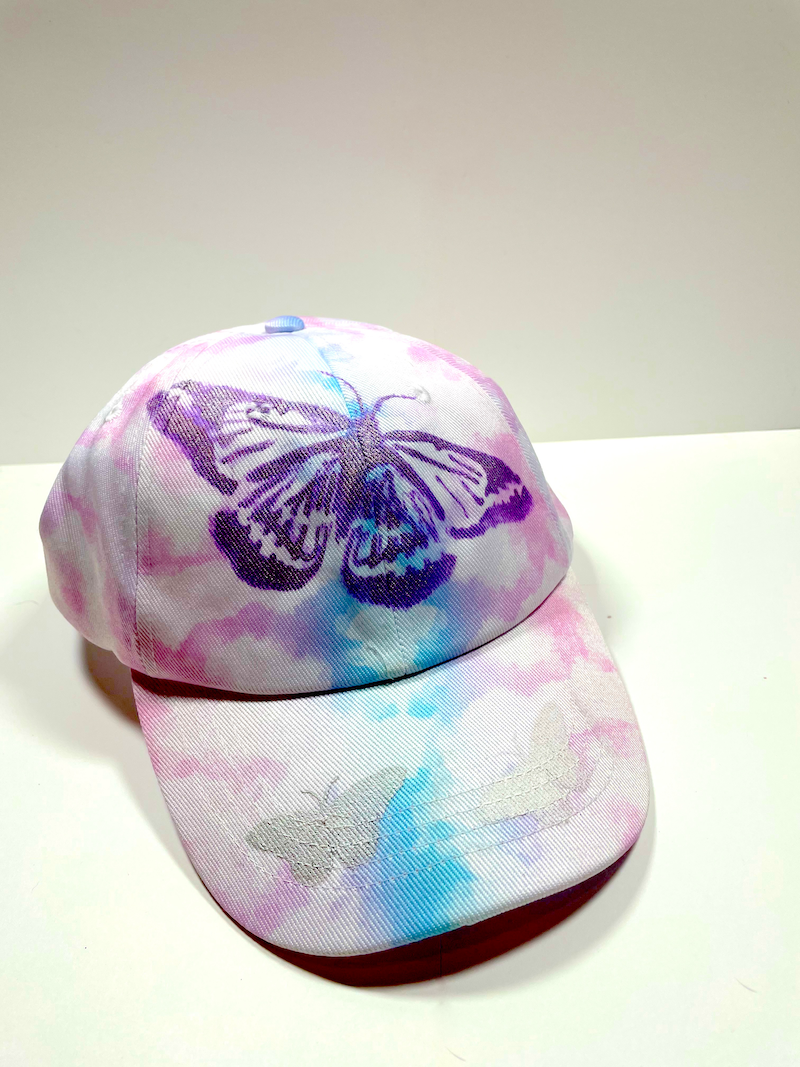
Στο νέο online παιχνίδι καζίνο του Nine Casino, εμπνευσμένο από τον κόσμο της κατασκευής στένσιλ, οι παίκτες μπορούν να δημιουργήσουν τα δικά τους μοναδικά μοτίβα για να ξεκλειδώσουν ειδικά επίπεδα παιχνιδιού. Immediate Byte Pro Neoprofit AI

If you need inspiration it’s right here! Pride Month can be a great time to show your pride and your support of the LGBTQA+ community. Our Stencils work great for any quick signs or window installations, making t-shirts, cards, prints, or artwork. Showing your support and love will keep all of us fighting for basic human rights. The LGBTQA+ family should feel welcomed everywhere.

BE sure to scroll down on how to use these stencils and see some fun past Pride events we hosted!

A Fun Chalk Mural
Levi’s X Stencil1 DIY Event!
The Love Stacked Stencil Looks Great On Anything!
In Residence Showcase

Here’s a How-to Video Using the Equality 4 Pack Stencil

A Quick How To Video On an Ombre Effect on a Shirt

STENCIL1 Stencils make posters, window signs, t-shirts, and art all about Equality and Pride, a breeze. Here are our favorite stencils for these projects.

Unicorn Silhouette Stencil
Unicorn Silhouette Stencil Small
Rainbow Stencil
Love Stacked Stencil Small
Love Stacked Stencil
Equality Stencil 4 Pack
Stripes on Heart Stencil
Heart Dripping Small Stencil
Rainbow, Unicorn 4 Pack Stencil

Please share your PRIDE-ful Stencil1 creations with is @Stencil1 and #stencil1 Thanks!


“Sailing into Summer and Counting Down the Days”  The idea for this art journal entry came from the Hexagons Stencil and the vision to make paper coins that could simulate flower petals.

Materials Needed:

Start out by sprinkling Infusions or Magical Powders onto the journal pages, I used two versions of blues but there are other colors like browns and pinks that come to life when sprayed with water.  I pressed both damp pages together to make a Rorschach image and let dry.

I laid out the Hexagon Pattern I wanted and traced the shapes to have an idea where these coins would eventually go.  Next, add some Numbers Washi Tape, (adding some extra glue stick under the Washi and clear gesso over the top helps to adhere more permanently…)  Place the Radial 2 stencil over both “Hexagon Flowers” and use blue acrylic paint with a makeup sponge through the stencil.

Place the Hexagons Stencil over and neutral ephemera or collage-paper in hand, trace and cut out the hexagon shapes, and edge in brown ink.  I used the round descending circles from the Patterns and Bookmark Bullet Journal Stencil to make the center of my flowers by spreading Chalk Paste in White through them.  The Blossoms Stencil was then used in random spots on 6 of the other “petals” in a contrasting Sand Color.

I used brown ink through the Bookmark Flowers from the Bullet Journal Stencil down the right edge and in several other spots and added other numbers Washi Tape vertically up the right side. The Industrial Font Stencil was the perfect thing to reinforce the edges and layer over the Washi tape.  White embossing powder was heat-set over clear ink and through that stencil continue to heat-set the numbers off on the pages and reinforce the idea behind this spread.

The final details included a vintage sailboat photo, some hot pink punches dictionary circles, a numbers stamp with aqua embossing powder in 2 places, sand and black embossing powders to grunge up the edges, and the typewritten title of this journal entry.

Happy Journaling,
Tracy
@anonymous.palette

Do you create Mixed Media and papercrafts with Stencil1?
Please share with us on social @Stencil1 and #stencil1 


Materials Needed:

Color Mixing

For this project, I used a pallet of muted spring colors. A mix of red and orange with a splash of green to dull it down for the lotuses with a mustard yellow made by mixing the deep yellow with what I used for the first layer of the lotuses. The blues I used for the Soft Chain Stencil were a mix of ultramarine and cobalt. The green I used for the leaves and in the radial pattern and Asian star pattern was a combination of deep yellow, cobalt blue, titanium white, and scarlet red. For the very muted purple, I added more cobalt blue and scarlet red to the green I had mixed. 

Process

I refinished my table first, but if you already have the surface you are happy with, you can skip this step. First, I lightly sanded and primed my table with a high quality water based furniture primer. I chose a pale blue latex paint for the table so my stencil patterns would stand out.

When dry, I used a yardstick to draw an X from corner to corner to ensure my pattern would be evenly distributed. I used two simple lines and based the placement of my stencils on that. No measuring or math was used in this project but if you are a stickler for symmetry, you may want to incorporate some of that.

I started painting with a burnt orange that I had mixed up and used a lightly loaded dry brush first and then did a second coat, using the stippling technique, building up two layers of paint. After painting in each coat, I used a blow dryer to keep the process moving along while avoiding smearing the paint already applied. Once all four lotuses were painted in, I painted in the second layer of the lotus stencil highlighting the flower with a mustard yellow, again using the dry brush, tapping technique.

For the Soft Chains Stencil on the corners, I used a teal in a dry first layer, then went back over with a deeper blue. Each time using very little paint and tapping with the brush to build layers and texture. Once that was dry, I added a free hand-painted leaf shape within each of the Soft Chain shapes in pale green. I felt it added balance to the design and fit in with the flower design.

Lastly, I used a very muted purple to paint in the center for the Asian Star stencil. My original pencil guidelines were still visible and I used that again as a guide to line up my stencils. After the light coat of purple, I went back in with the green I had used for the leaves on the corners and lightly peppered in some highlights. As a final touch, I used the same purple and green combo of colors to paint in the small radial design stencil in the corners.

This project was challenging and fun for me and it was really enjoyed the process as well as the finished product. I hope you do as well!

This project was made by our lovely friend, Teri @tjaneiro2 on Instagram
Please share your creations with us @stencil1.com


What you will need:

“Spring Sprang Sprung”.  A journal Entry inspired by the adorable bee shape as part of the Icon Stencil.  Start out by laying down a few washi tapes in a pattern and covering them in clear gesso.  When dry, use a honeycomb stamp and Faded Jeans Permanent Ink and stamp in a few areas around edges and over the washi. 

Select some acrylic paint, I used Sand, Caramel, and Dusty Teal and blended with a brush over both pages. Before it’s completely dry, place the Y Repeat Stencil on top of both pages, and with a baby wipe out the paint through the stencil (called reverse stenciling).

Next, find collage paper or dictionary page and using the Flourish Borders 8 Pack Stencil, sponge Dusty Teal Acrylic Paint through the stencil onto the page. Cut these borders out for collating onto the spread.  Also, with permanent black ink, sponge through the bee Stencil from the Icon Stencil onto watercolor paper and fussy cut 8 of these.

I placed the Patterns Stencil on the left page and using Caramel Acrylic Matte Paint created a honeycomb pattern across the pages.  I used a bit of pastel through the same stencil when dry to create a 3D effect.

Arrange collage elements.  Cutout Flourish Borders and Bees onto both pages and glue.  I decided to add wings to my bees and used 3 different pearl glazes in Gold, Ice, and Teal colors spread back through the bee stencil with a palette knife and cut out the wings, attaching with glue when dry just in the center of the body so the wings “lift”. I added a hole punch out on top for added interest.

The final details included two stamps: a drippy stamp and a small honeycomb stamp stamped with clear embossing powder and embossed with vintage beeswax to give the look of honey dripping off the pages.  I used another edge stamp around the perimeter and some Ice glaze around the edges to border both pages and typed  Spring, Sprang, Sprung and glued down to finish this entry out…

Happy Journaling! ~ Tracy @anonymous.palette
Please share your creations with us @stencil1.com


This project was a definite nod to the great artist Georgia O’Keefe. Ahead of her time in her work, she paved the way for women artists in Modern Art. From minimalist cityscapes to sensual flowers and glorious landscapes, her work is known around the world and inspired artists for decades.

Materials And Supplies:

Process

Color mixing

For this project, I mixed up some purples, pinks, and yellows to start. I used a lot of titanium white and mixed up a few darker hues to create a lot of shading and gradation for the background.

Step by step process

For the background, I painted out a few dark brown paint strokes using lines that would mimic the shape of the skull. I did some basic shading and gradation with different values adding white and blending pinks and yellows on the canvas.

Next, I stenciled in the radial pattern and Asian star pattern using colors already mixed on my palette and used variations of the colors I used in the background painting. I wanted the stencils to blend in but add texture and interest. I loaded the brush frequently and no water was added,  allowing for thicker layers of paint while preventing bleeding under the stencil. I used a small stencil brush for the radial pattern, tapping the thick paint on while holding the edges of the stencil down firmly. For the Asian star pattern, I used a flat paintbrush to sweep across the stencil in a few quick strokes to give the impression of the shape and uneven texture I was looking for.

Then, I mixed black and brown for the skull. I wanted the skull to have texture and be pretty solid in color, so I mixed up a little more color for that than usual. No water was added and I reloaded the brush frequently to get the amount of paint on the canvas that I wanted but built it up a little at a time. I used the tapping technique with a medium stencil brush, ensuring to press the edges of the stencil down firmly as I applied the paint.  After it dried, I applied highlights to the skull with dry-brushed light purple paint.

The final step was to use the stencil to paint seven flowers to create a border. The first layer was pale pink, then I went over that with a bright yellow with orange for shading and depth.

I had a lot of fun mixing colors and playing with sizes. A lot of the color mixing happened on the canvas, it was a really freeing process and the results were so different each time. I hope you have as much fun with this project as I did!

This project was made by our lovely friend, Teri @tjaneiro2 on Instagram
Please share your creations with us @stencil1.com