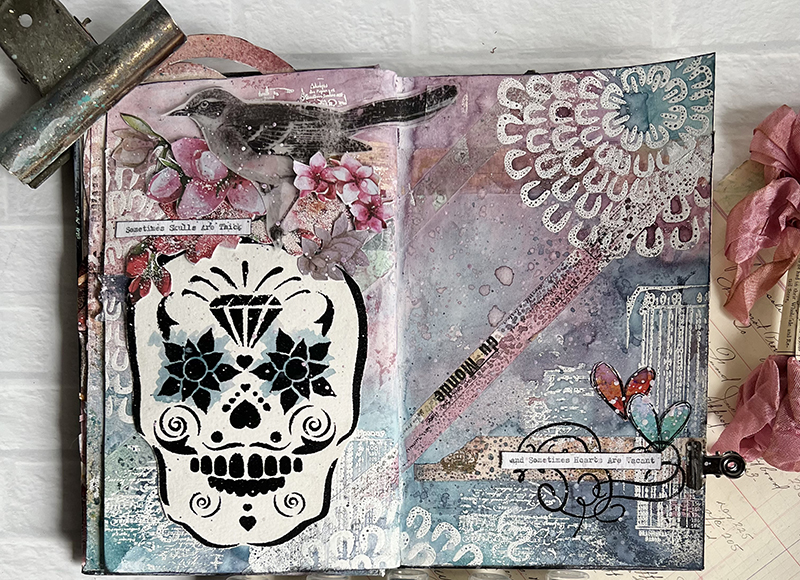
Στο νέο online παιχνίδι καζίνο του Nine Casino, εμπνευσμένο από τον κόσμο της κατασκευής στένσιλ, οι παίκτες μπορούν να δημιουργήσουν τα δικά τους μοναδικά μοτίβα για να ξεκλειδώσουν ειδικά επίπεδα παιχνιδιού. Immediate Byte Pro Neoprofit AI

For this year’s Pride mural that Ed Roth does each year for Chalk Gyms, he decided to make a chalk mural of an icon and hero of the gay liberation movement-Marsha P. Johnson.

Marsha P. Johnson, a black transgender woman, stood at the center of New York City’s gay liberation movement for nearly 25 years. But LGBTQ rights weren’t her only cause. She was on the front lines of protests against oppressive policing. She helped found one of the country’s first safe spaces for transgender and homeless youth. And she advocated tirelessly on behalf of sex workers, prisoners and people with HIV/AIDS. All while draped in dashing outfits and flower headpieces and armed, people who knew her say, with a vibrant smile.


It all started with a stencil design and colorful illustration to work from…

Then we chalked it on the chalkboard walls using colorful Crayola chalk. 


Great artistry help from Charles.

And then it’s done.


And posted to our reels on instagram @stencil1


And what’s the P for?

Marsha PAY IT NO MIND Johnson 
Happy Pride! Remember, the Pride march started as a riot and never take our rights for granted!


This post comes to us from our talented friend Tracy Hickman aka @anonymous.palette.

I’m excited to share this easy project and the process of how I created this Pop Up Journal Spread with 3 Stencil 1 Stencils!

Step 1:  Create Your Focal Image

On a sheet of Canson Mixed Media paper, I used the Stencil 1  #S1-01-80, Lotus Stencil, to sponge through Clear Embossing Powder. A granite mix Embossing Powder was sprinkled on and heat set.  I did this twice and cut out both Flowers (or in my case, Cactus 😉

I next used a few Sprays from Lindy’sGang to color the flowers.  You could use watercolors or acrylics here as well. Repeat on both Flowers/Cactus…

Step 2:  Create the Background

I next placed this amazing new Stencil1 #S1_PA _79,  Nature Damask Stencil,  across both pages of this Stillman & Birn Journal and sponged Clear Embossing Powder through the damask and butterfly portions of the stencil.  I used Black Embossing Powder for high contrast and heat set.  I replaced the stencil back over the pattern and then sponged Clear Embossing Powder through the two birds.   using a Metallic Chrome Embossing Powder to highlight these. (You could use acrylic paint here instead of embossing but I was looking for a slightly raised effect.)

Color your whole background first,  I used two different light pink sprays to give a mottled appearance and break the white paper.  I next used some Colored Magical Powders and Sprays to color the butterfly and birds. Watercolors would be a great substitute here as well…

Step 3:  Assemble your Pop Up!

On one of your Lotus Flowers, cut out carefully the center leaf.  I placed the new Stencil1  #S1_PA_86_S, Exotic Mum Stencil, over the top of the cut out leaf and sponged Clear Embossing Powder through, sprinkled White Embossing Powder  over the ink and heat set to indicate thorns, turning my Lotus into a Succulent Cactus 😉

Glue down the cut out flower across the center of the pages and bend under the two sides if your second full flower.  Place them making sure your book can still open and close and glue down those two under turned tabs. Then turn crease your individual petal down the center and glue just the crease portion on the pop up spine if your full Lotus.

I used two tea tags that I gessoes, colored and added my sentiments then stapled onto flower stickers that I placed in the birds beaks and voila, a spring inspired Pop Up!

Stay Creative!
Tracy

Please share your creations with us @stencil1.


Stenciling windows is easier than you think! This home has this lovely entry with French doors 
So we decided to embellish it with our Holiday 4 Pack, Nutcracker 4 Pack, and we used a stencil brush,
Acrylic white paint, and some masking tape. We also used low tack adhesive to hold the stencil in place.

When stenciling glass, you need even less paint than on a canvas. It’s a slippery surface and you don’t want
your paint going under the stencil.

Start by spraying a light spray of adhesive on the back of the stencil. Let dry 60 seconds. Tape the stencil in place.

Dab your paint into the open areas of the stencil until full.

stencil windows
stencil windows
stencil windows

Reveal the design and REPEAT!

stencil windows
stencil windows

These wood trees were from the dollar store. What better way to make them look not-dollar like than to paint them black and add some metallic pattern!


I used our Dots Repeat, Chevron Repeat, and Strings of Dots stencils. I have to say I am not a huge spray paint person because of lack of outdoor access, but I took it to the sidewalk and spray paint is my new best friend again. You can work so fast with spray paint! I coated them black.

It dried fast so I could then stencil patterns on top of the black
using silver and gold spray paint. Done!

Inspired by this project? Share your creations with us @Stencil1


I stenciled Ribbon to use on a garland and wreath. Ribbon is very thin so be sure to work on a cardboard surface as the paint will bleed through.

I stenciled 9 feet of ribbon and alternated designs from Merry Christmas to the holly branch in black fabric paint.

The garland we purchased was pre-lit and came from Target. This made things easier but the garland is thin so Teri had the brilliant idea to fill in the garland around the light post with some real branches.

She also did this with an old fake wreath she had! Just a few branches really helped fill it up and make it all look like the real thing. The ribbon flows nicely around it all, giving it that handmade touch.

Inspired by this project? Share your creations with us @Stencil1


Painting candles with water based acrylic paint is so satisfying. Our stencils bend nicely around curved surfaces!


I stuck with our black and white plan. These were later placed in the lanterns and so from the front of the lanterns you see the angel on the glass and the side view you get a nice stenciled view!

Inspired by this project? Share your creations with us @Stencil1