Στο νέο online παιχνίδι καζίνο του Nine Casino, εμπνευσμένο από τον κόσμο της κατασκευής στένσιλ, οι παίκτες μπορούν να δημιουργήσουν τα δικά τους μοναδικά μοτίβα για να ξεκλειδώσουν ειδικά επίπεδα παιχνιδιού. Immediate Byte Pro Neoprofit AI

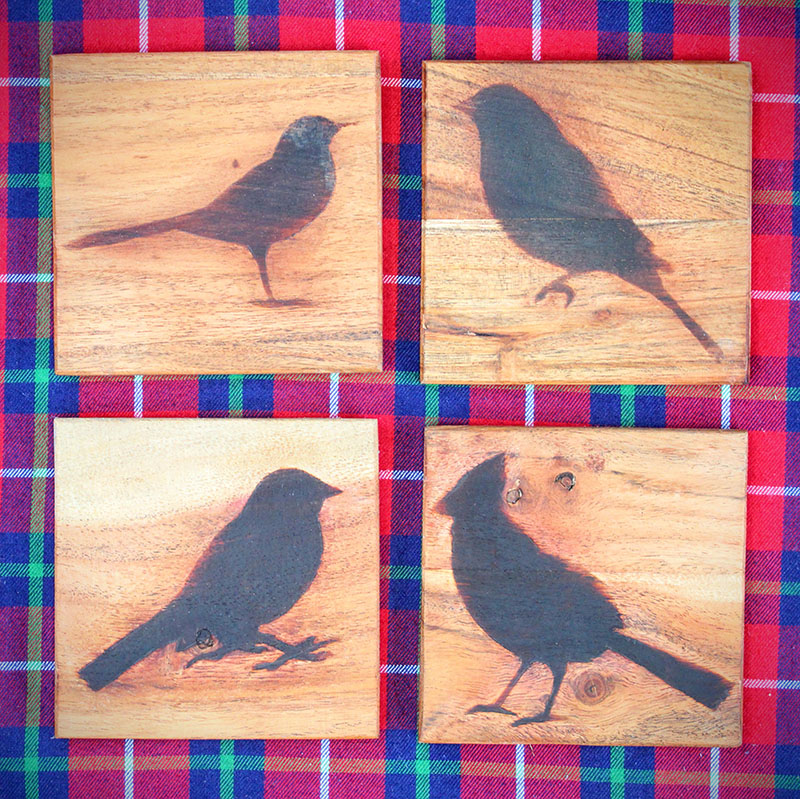
Everyone has those unwanted water rings on their wood furniture, we’ll help make sure that never happens again with these wooden bird silhouette coasters.

Here’s what you will need:

Most pre-made wooden coasters come with a waterproof finish, so we’ll need to remove that layer by sanding them down.

Grab a stencil and apply painter’s tape to the backside.

Center Stencil1 stencil on coaster.

Using a led pencil, trace the outline of the stencil.

Now fill in the image with your wood burn marker.

Use your heat gun to burn in the image. Repeat these steps for the remaining coasters.

The final step will be applying a waterproof wood finish with a rag. Doing this will not only protect the wood but also showcase the grain and allow the images to pop.

You’re all done, congrats on your brand new Stencil1 coasters!

This How-To was brought to you by ART one (@art_o_n_e)

Please share your version with us @Stencil1


With the weather getting colder and allergy season seeming to hang around, tissue box use is in full effect. With this tutorial, we’ll show you how to blend those cardboard boxes into your seasonal decor.

Here is what you will need:

Begin by removing your Stencil1 stencil from the packaging and applying a piece of painter’s tape to the left and right sides.

Position and attach the stencil and outline the trees and stars.

Once you’ve outlined the entire stencil, remove it from the box.

Attach the fine point bit and then plug in your woodburning tool and set it to the appropriate setting for the wood you are using. Make sure to place the tool on the stand if your kit came with one so you don’t risk it rolling and burning something.

Once the tool is fully heated, begin tracing the pencil marks you laid down. You can also fill in the stars with the fine tip.

When you’re done outlining and the wood has cooled, you can grab your pencil and erase any remaining pencil marks that are visible.

Change over to the leaf-shaped tip. (You might need to turn off the heat and let it cool.) when the new tip is on, you can fill in the trees.

Last you will need to switch over to the flathead tip to fill in any detail that you were unable to with the last tip.

Now you’re all done and can slip your cover over a tissue box, and find a great place for this guy to live during the winter months.

This How-To was brought to you by ART one (@art_o_n_e)

Please share your version with us @Stencil1


Tired of having to fill your Douglas fir with generic mass-produced ornaments?! Why not create your own one-off ornaments that are sure to be unique. Just follow along with these easy steps…

Here is what you will need:

Grab your blank ornaments and select a shape to begin.

Lightly spray the back of the stencil with stencil adhesive. You can recoat as needed throughout the project.

Position and place your Stencil1 stencil on your ornament.

Using your fine point Posca marker, start by outlining your stencil then filling in the contents.

Carefully remove the stencil and allow to dry.

Repeat steps for your next ornaments.

Pro tip: Choose stencils that complement your ornament shapes.

Make sure to experiment, like using multiple colors on the same stencil.

When you are all done, spray a couple of coats of gloss clear coat to ensure the Posca paint will adhere to the ceramic and last for years to come. Make sure to ONLY use water-based clear coat when using water-based markers Solvent based clear coats will harm any waterbased paint.

[IMG_9130~2]

Now you can finally break out the egg nog and crank up the fireplace cuz you’re all done and ready to display your masterpieces.

You can thank ART one (@art_o_n_e) for this beautiful DIY

Please share your version with us @Stencil1


With air travel starting to pick back up again, you will no longer be able to spot your boring black suitcase at the luggage carousel. But have no fear, we’ll help you transform your suitcase so that it stands out amongst the crowd.

Here’s what you’ll need to get started:

Begin by applying a border of painter’s tape around the Stencil1 stencil. I like to add an additional border just to prevent overspray.

Now flip over your Stencil1 stencil and apply a light coat of stencil adhesive.

Determine how you are going to layout your headphones on your suitcase and place the stencil accordingly.

Grab your first color of spray paint and apply a light coat of paint, as the plastic surface will not absorb the paint so any excess paint will drip.

Reposition your stencil to a new location and repeat the process. I like to work with one color at a time.

Now grab your next color and spray it on the suitcase, make sure to recoat the back of your stencil with stencil adhesive as needed.

On to your next color.

Once you’ve painted your last color, you are all done! You now have a unique suitcase that is sure to be the talk of the town, or should we say terminal!

This is another clever project from LA-based artist ART one (@art_o_n_e on Instagram).

Remember to share your version with us @Stencil1.


With Halloween just days away, now is the perfect time to carve your pumpkins without them rotting before the big day. Using a Dremel, we’ll show you a non-traditional way of shallow carving your pumpkin.

Here’s what you’ll need to get started: Mummy Stencil-Small (5.75″x6″), a fresh pumpkin, a Dremel and bits, pumpkin carving tools, painters tape, wax paper, fine point posca marker, disposable gloves, a light source for inside the pumpkin.

First, forget what you knew about carving a pumpkin, we’re gonna walk you through an easier way. Flip over your pumpkin and carve a circle using your pumpkin saw.

Glove up and remove the circular piece that you carved. Grab your scraping tool and scrape all the inner walls while not removing any pumpkin guts yet.

Once you’ve scraped the inside entirely, pull out the innards, it should all come out in one big clump. We like to separate and save the pumpkin seeds and oven-roast them with some sea salt.

Remove your Stencil1 stencil from the packaging and tape it to your pumpkin.

Grab your fine point Posca marker and outline your image.

Plugin your Dremel and place a fine bit in it. Outline the edges of the image. Now replace your bit with a circular one and remove the larger areas.

The good thing about using Poscas is that they’re water-soluble. Grab a damp paper towel and clean up the carving and any remaining ink.

just place your light source inside the pumpkin and you’re good to go. (We found that orange string lights work really well.)

This How-To was brought to you by ART one. Follow him at @art_o_n_e on Instagram.

Did you carve a pumpkin with Stencil1 stencils? Please share your creations with us using #stencil1 and @stencil1. HAPPY HALLOWEEN!


With Dia de Los Muertos fast approaching, now is the perfect time to customize some clothing with a Stencil1 Sugar Skull stencil.

You’ll need some tools and supplies to get started:

Begin by flipping over your stencil and applying stencil spray.

Insert your wax paper behind the layer you will be painting on.

Center and place your stencil on the back of your vest.

Grab your white Posca marker and color in only the outer part of the image. 

Now remove your stencil and color in the skull head silhouette.

These images show a single coat vs. multiple coats. Recoating is recommended as this will be the base for your other colors. Allow paint to dry between coats.

Realign and place your stencil back on your vest. Color in the outline of your skull as well as any other part you want black.

At this point, you can use your Poscas to color in the remainder of the stencil to your liking.

Remove the stencil, flip over the vest, and iron the back of your image, this will fully cure the paint so that it won’t come off in the wash.

You’re all done and ready to rock your cool new sugar skull vest thanks to your pals over at Stencil1.

This How-To was brought to you by ART one, a Los Angeles based Street Artist. You can see his art @art_o_n_e

Please share your version with us @Stencil1