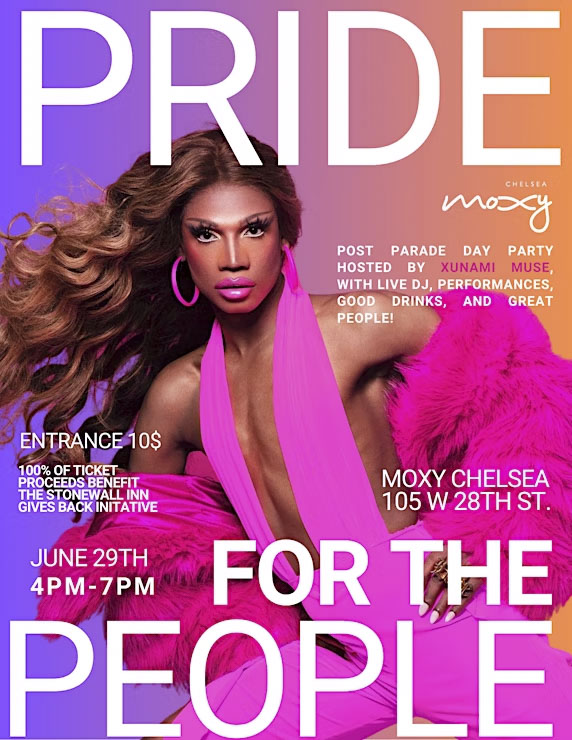
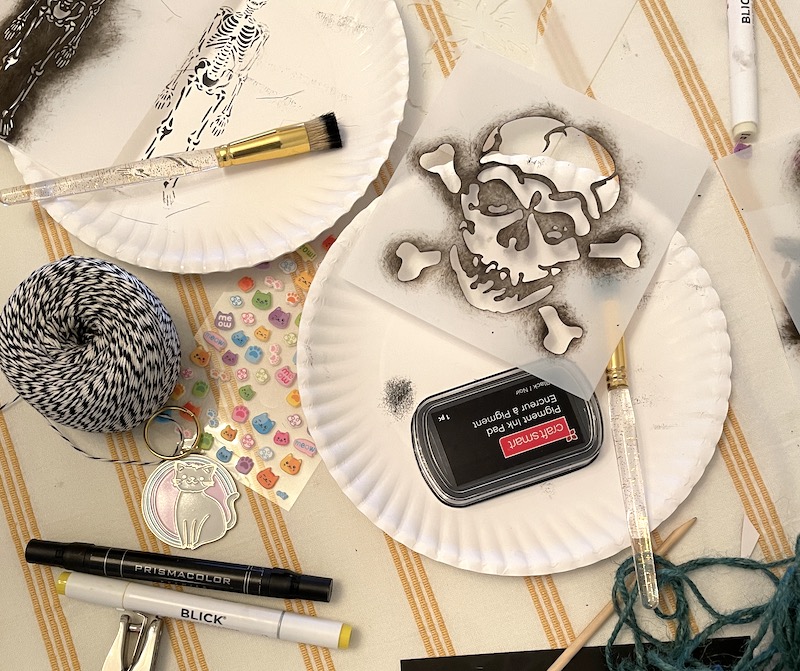
Στο νέο online παιχνίδι καζίνο του Nine Casino, εμπνευσμένο από τον κόσμο της κατασκευής στένσιλ, οι παίκτες μπορούν να δημιουργήσουν τα δικά τους μοναδικά μοτίβα για να ξεκλειδώσουν ειδικά επίπεδα παιχνιδιού. Immediate Byte Pro Neoprofit AI

This post is coming to you from Tami M., contributing blogger, mom to a second grader, and all around great gal!

If you’ve been shopping lately, you’ve learned that Halloween is NOW. In our home this holiday of ghouls, ghosts and monsters is bigger than Christmas. Our late-summer days have been filled with crafting decorations for what my seven-year-old daughter describes as “the greatest night of the year.” As we transition into the school season, a stenciled Monster Garland is an easy, mess-free after-school activity that uses tools and supplies you’ll probably have on hand. We’re using this garland as the centerpiece of our Halloween fireplace-scape but it can easily be used just about anywhere in the home. This is a work in progress—pumpkins and other fall festiveness to come.

For your Halloween Monster garland, you will need:

-Multiple 5.75″ x6″ monster stencils. We chose an owl, a skull and crossbones, an evil jack-o’-lantern, Frankenstein, a raven, a skeleton and Dracula.

-Paper (we used sheets from an Artist’s Loft Watercolor Pad)

-An ink pad

-Round paintbrush

-Painter’s tape

-Hole puncher

-Baker’s twine

Step 1: Start by selecting your stencil design and figure out placement on the paper. Be sure to tape the stencil to the paper so that it doesn’t move while painting. Painter’s tape is a must so that it doesn’t damage the paper when peeling off.

Step 2: Once you are ready to paint, dab the ink onto the brush and then dab dab dab onto your stencil. The ink pad is very forgiving and won’t bleed under the stencil but never say never so do a few test runs to find out the ideal amount of ink that you’ll want for your design.

Step 3: When finished, remove stencil and let dry. *Remember, this craft is not about perfection. It’s an activity that is both structured and open-ended so let the kids explore with designs and color. We stuck with a black and white theme because those are the supplies we had in the craft cupboard.

Step 4: String your monsters together to assemble the garland. Add pumpkins and pots of mums to embellish.

Please share what you made by using #stencil1 and tagging @stencil1 on social media.


This post comes to us From Charley Roth and shows you how she customized a skate deck with Stencil1 stencils. Make your skateboard a unique, one-of-a-kind work of art with stencils. Here’s what you need:

Featured Materials:

• Brick Stencil
• Heart Dripping Stencil
• Drip Marks Stencil
• Tattoo Cherries Stencil
• Stencil brushes
• Flat brush,
• Acrylic or multi-surface paint
• Optional: low tack spray adhesive and tape

First, I painted a base coat of white.

Then, I placed the brick stencil and got a tiny bit of paint on my brush and dabbed the brush over the stencil.

I repeated this step until the whole board was covered with the brick repeat pattern.

After that, I grabbed the stencils I wanted to put on top of the brick and did the same thing.

I tried a few different techniques and I found it the easiest if you did the stencil in white first and then in the color you want due to the background being dark.

I repeated this with the spray paint drips stencil as well.

Then I decided to add a few more stencils and a couple of finishing touches!

by Charley Roth

@CharleyRoth


Juneteenth – also known as Freedom Day, Jubilee Day, Liberation Day, and Emancipation Day – is a holiday celebrating the emancipation of those who had been enslaved in the United States.  Why not add to the celebration with some DIY crafts like making Juneteenth art, t-shirts, and more.  You can read all about it here!

So grab your paint colors of choice and the right paints for the surfaces you are painting, acrylics for artwork, and fabric paint for t-shirts. These stencils will make the day a creative celebration of true freedom! Here is some Inspiration!

We Offer Two Variations of The American Flag, and A Power Fist

Take A Gander!
American Flag 2 Layer Stencil 8.5″ x 11″
Power First Stencil 8.5″ x 11″
American Flag Stencil Small 5.75″ x 6″

Do you have some Stencil1 creations you’d like to share with us?
Please share with us on social @Stencil1 and #stencil1 


We feel so proud, here at Stencil1 every time someone shows us what they made!
Check out this exciting project – Our customers created wood burning stenciled signs for a forest path in Eberswalde, Germany only 65 km south of Berlin! A small school with 90 pupils wanted to help out the local park ranger create signs for the various paths within the woods. They used our Baby Deer Stencil to create wood burning signs! They will keep us updated a long this project.

Check Them Out! These Students Smiles’ Say Everything!

Do you have some Stencil1 creations you’d like to share with us?
Please share with us on social @Stencil1 and #stencil1 


Beginner Art Journaling in an altered book using Stencils two different ways.

Materials Needed:

Any hardback book or novel
Glue stick
Clear and White Gesso
Flourish Borders Stencil 8-pack
Thatched Texture Stencil
2 Quatrefoil Stencil Small
Blossoms Stencil
Color Infusions or Magicals 
 (You could substitute watercolors)
Painted Papers or Collage Paper
Acrylic Paint in San, Chalk, Periwinkle 
Washi Tape
Molding Paste
Water in a Spray Bottle
Chalk Paste in Sand
Watercolors
White Cotton fabric 
Embroidery Floss
Embossing Powder

Step 1: Prepare your Book
You can work in an art journal but recycling an old hardback book or novel laying around is a fun way to start journaling with little investment. I usually glue the left page to the page behind with a glue stick and do the same thing to the right page to reinforce the pages depending on the paper thickness. Next coat both pages in a layer of white gesso, A lighter coat see your text shows through, or do a couple of coats to cover completely. (It’s a good idea to tear out three or four pages between every journal entry to allow for thick layers that get built and then discarded pages can be used as collage elements

Use a couple painted papers, magazine pages or collage papers that you have laying around and tear into different width strips.

Step 2: Develop a Background
Using the glue stick, adhere your paper strips in a pleasing pattern onto your pages.
Choose one or two acrylic paints, (I chose a sand color lightened with white that blended in with the back of my dictionary page strips) Paint over the white gessoed blank background and blend in scrap paper strips.

Place the Thatched Texture Stencil over your painted papers and sponge sand-colored acrylic paint pounced through the pattern. (I love this stencil as it can be used vertically, horizontally, or on an angle for completely different effects and also stacked over top of itself to make a hatched pattern ;). This technique helps harmonize your collage paper strips with the background.

Step 3: Add Washi Tape and more Stenciling
Choose a few different Washi Tapes, masking tape can be substituted here. I always use a coat of clear gesso over the washi tape to let future mediums adhere better. Place the Quatrefoil 2 Stencil over the washi and pounce periwinkle paint through the stencil onto both pages.

Using the Thatched Texture Stencil a second time, spread molding paste through the pattern with a silicone brush, gift card, or palette knife, and let dry. 

Step 4: Final Layers with Stenciling Two Ways
Infusions or Magicals are small jars of pigments that can be sprinkled onto the page then spritzed with water so the colors magically appear. This technique was used over the dried molding paste Thatched Pattern. (It can be fun to tilt the pages this way or that for the colors to move around and you can also blot back the color if you don’t want it so vibrant)

Next, spread Sand Chalk Paste (or Molding Paste tinted Sand) through the Blossoms Stencil onto the discarded book pages and cut out when dried.

Using the same Blossoms Stencil, trace the pattern onto some plain fabric and use embroidery floss to stitch over the design. Glue the threads on the backside and when dry cut out your Blossoms. (This pattern embroidered on a pair of jeans would be fun!)

Step 5: Apply Blossoms and Final details

Glue your paper Blossoms down with a glue stick and glue your embroidered blossoms down with a thicker glue-like gel paste or fabric glue. Hand paint some details on your blossoms with watercolors and a white gel pen. I next cut out and adhered my quote, “Hope is a thing with Blossoms” and framed it with the Flourish Border Stencil by sponging clear embossing powder through the stencil and heat setting white embossing powder. Add some stamping with brown ink in a few spots and use the same brown ink around the edges of both journal pages. Finish by heat setting some Baked Texture Powder smudged onto a few areas over clear embossing ink and you’ve completed the first entry in your altered book! 

Happy Journaling!

Tracy Hickman
@anonymous.palette 

Do you create Mixed Media and papercrafts with Stencil1?
Please share with us on social @Stencil1 and #stencil1 


Materials Needed

Process
First I measured out the center of my mat and worked the placement of my lettering around that.

I kept it very straightforward, centering the words about 8 and 1/2 inches in from the edge of the mat. Then I taped down my letters going all the way off the mat and securing the tape to the table, as it would not really stick to the doormat.


Once I was satisfied with the placement of the letters, I then used a large 1-inch stencil brush to tap into the paint. The first application was with a very dry brush, then I went in a little heavier with the second and third coats.


For this project, you really have to give it a heavier hand in order to get into the mat fibers so you get a uniform look. For the border, I used the leopard print stencil.


I used more paint on the brush at the edges and a drier brush towards the center to give it a faded look as the pattern gets closer to the lettering. After it dries, you can spray it with a layer of clear shellac for extra durability.

Happy Crafting!
~ Teri @tjaneiro2 on Instagram


Do you create Mixed Media and Home Decor Updates with Stencil1?
Please share with us on social @Stencil1 and #stencil1