Στο νέο online παιχνίδι καζίνο του Nine Casino, εμπνευσμένο από τον κόσμο της κατασκευής στένσιλ, οι παίκτες μπορούν να δημιουργήσουν τα δικά τους μοναδικά μοτίβα για να ξεκλειδώσουν ειδικά επίπεδα παιχνιδιού. Immediate Byte Pro Neoprofit AI

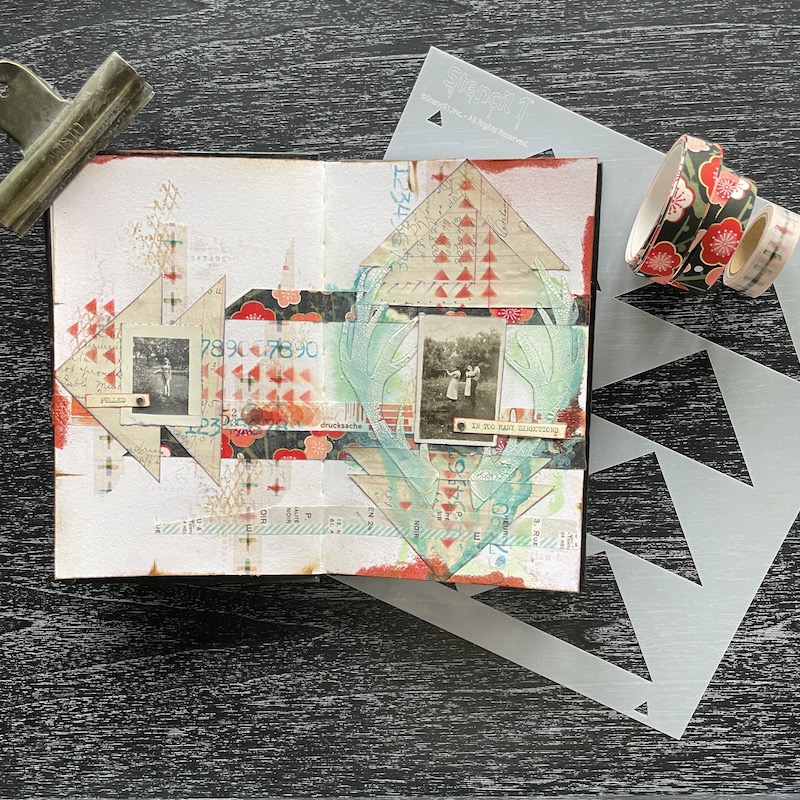
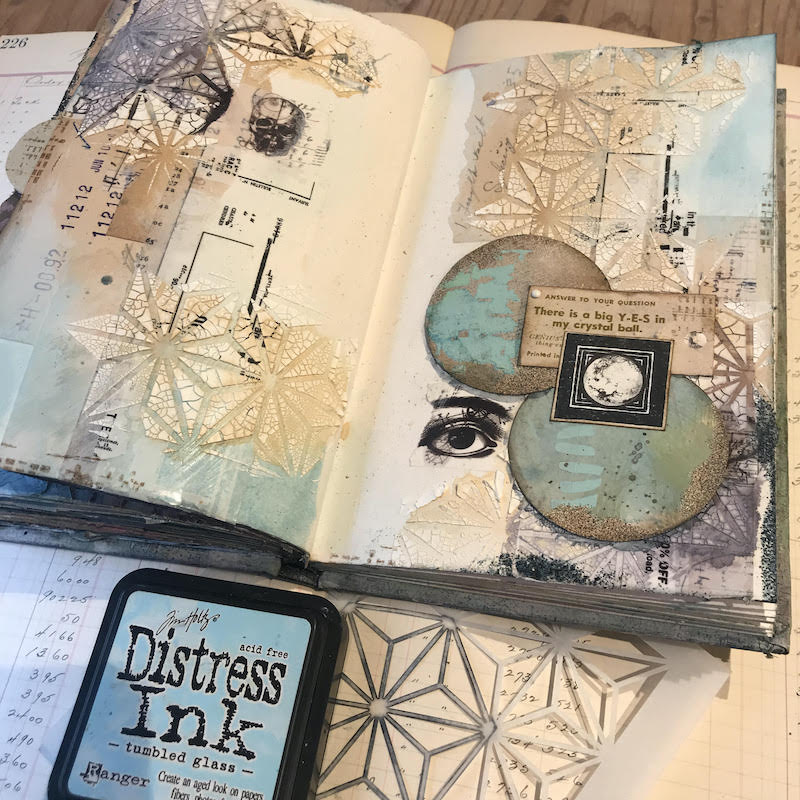
Beginner Art Journaling in 5 Easy Steps…

Materials Needed:

Step #1 Washi Layer: Place several washi tapes down in a pleasing pattern across your pages. Add glue stick under the tape for permanence and a layer of clear gesso over top.

Step #2 Collage and Stamping: Using an old ledger page (or any collage paper you may have on hand) trace the Triangles 2 Aligned Stencil with a pencil and cut out triangles.

Step #2 Continued: Place triangles down in a pattern of your choosing, I overlapped mine. Glue down with a glue stick and cover in clear gesso. Add some stamping in red ink through the small triangle stencil in the Patterns 8 Pack Stencil to marry all the elements. I also added brown ink to a chain-link rubber stamp in a few areas and teal ink with a numbers stamp.

Step #3 Stencils: Place the Antlers Small Stencil down over the collage elements and hold in place with washi tape. Using a palette knife or gift card, spread crackle paste through one antler at a time when dry. Let crackles appear without heat setting for the best effect. 😉

Step #4 Spray Inks: Color the Antlers with your favorite spray ink, I spritzed water over the crackle paste and used the applicator out of the bottle to touch around edges. (you could also substitute watercolors or water-soluble crayons or watered-down acrylic paint here if you don’t have spray inks. Build up with a few colors after heat setting.

Step #5 Focal Point and Edges: Select 1 or 2 photos to place as a focal point, ink edges so they stand out, and glue down. I typed the phrase “pulled in too many directions” and affixed it with small metal Brads through both pages. The final detail consisted of edging the outside of all the pages with brown ink and smudging some clear embossing ink in a few spots around the edges. Heat set red baked texture powder for some edging drama.

Here Are The Details!

Happy Journaling,
Tracy
@anonymous.palette

Do you create Mixed Media and papercrafts with Stencil1?
Please share with us on social @Stencil1 and #stencil1 


“Sailing into Summer and Counting Down the Days”  The idea for this art journal entry came from the Hexagons Stencil and the vision to make paper coins that could simulate flower petals.

Materials Needed:

Start out by sprinkling Infusions or Magical Powders onto the journal pages, I used two versions of blues but there are other colors like browns and pinks that come to life when sprayed with water.  I pressed both damp pages together to make a Rorschach image and let dry.

I laid out the Hexagon Pattern I wanted and traced the shapes to have an idea where these coins would eventually go.  Next, add some Numbers Washi Tape, (adding some extra glue stick under the Washi and clear gesso over the top helps to adhere more permanently…)  Place the Radial 2 stencil over both “Hexagon Flowers” and use blue acrylic paint with a makeup sponge through the stencil.

Place the Hexagons Stencil over and neutral ephemera or collage-paper in hand, trace and cut out the hexagon shapes, and edge in brown ink.  I used the round descending circles from the Patterns and Bookmark Bullet Journal Stencil to make the center of my flowers by spreading Chalk Paste in White through them.  The Blossoms Stencil was then used in random spots on 6 of the other “petals” in a contrasting Sand Color.

I used brown ink through the Bookmark Flowers from the Bullet Journal Stencil down the right edge and in several other spots and added other numbers Washi Tape vertically up the right side. The Industrial Font Stencil was the perfect thing to reinforce the edges and layer over the Washi tape.  White embossing powder was heat-set over clear ink and through that stencil continue to heat-set the numbers off on the pages and reinforce the idea behind this spread.

The final details included a vintage sailboat photo, some hot pink punches dictionary circles, a numbers stamp with aqua embossing powder in 2 places, sand and black embossing powders to grunge up the edges, and the typewritten title of this journal entry.

Happy Journaling,
Tracy
@anonymous.palette

Do you create Mixed Media and papercrafts with Stencil1?
Please share with us on social @Stencil1 and #stencil1 


“Tag You’re It” was inspired by the Antlered Deer Stencil and the sadness I feel for these majestic animals during hunting season up here in northern Michigan.

The first layers started out with PaperArtsy Fresco Finish Paints in Caribbean Sea and Mermaid painted onto both pages of an altered book. Some vintage prescriptions were glued down with a UHU glue stick and a few washi tapes with mountains and grasses glued down as well. A layer of clear gesso went down over everything.

When dry, I painted the right page with PaperArtsy Eggshell paint and placed the Polka Dots Houndstooth stencil over the eggshell paint, and lifted the paint up through the stencil with a baby wipe to reveal the aqua circles. Next, I sponged PaperArtsy Caribbean Sea through the stencil on the left page over the papers to unify both pages. A few black and white collage elements were glued down as a base for my focal point.

I used the Antlered Deer Stencil onto vintage ledger sheets and spray painted Ironlak Sugar Sprays in Black and Orange through the stencil twice. I cut out each deer and used the black one as a shadow behind the orange deer and offset them slightly gluing together.

Some stamping around the page edges with Stamps and Baked Texture Embossing Powders from Seth Apter and in Dirty Sand and Vintage Beeswax created some bordering along with some Distress Ink in Vintage Photo.

I also stamped over some vintage tickets with a measuring tape stamp and embossed with Eclipse Texture Powder and glued these elements under a piece of decorative packing tape. Lastly, I cut out “died or removed” from the same piece of vintage ledger paper the deer came from and typed a note saying “Tag You’re It” on a vintage typewriter and affixed with a small white brad onto the ear of the deer.

Wishing hunting season ends soon…

This is another beautiful post from Tracy Hickman (@anonymous.palette on Instagram)

Please share your creations with us @Stencil1


“Admit One” These pages were built around a vintage Ferris Wheel Postcard.

I used several Distress Oxides (smudged onto a craft mat and spritzed with water and pressing the pages into the watery ink.) I next found some washi tape tickets, donuts, and letters that seemed to go with the color palette and theme and glued the tape down covering all the pages with clear gesso.

A small honeycomb stamp from Indigo Blu was inked with Picked Raspberry Archival Ink from Ranger and stamped in several places over the pages and heat set.

I completely covered both pages in PaperArtsy Eggshell paint and placed the Y Repeat Pattern Stencil over the pages and lifted the paint back off with a baby wipe so the pattern of the stencil showed while uncovering the color and patterned details underneath.

I next used the Small Geo Pattern Stencil and placed it in several spots on a sheet of vintage ledger paper, masked off some spots with washi tape, and spread Texture Paste Opaque Crackle from Ranger with a palette knife through the stencil. After letting the crackle paste dry naturally, I cut out the patterns and place them on the journal pages, leaving a pocket on the lower right to hold ephemera. I colored the crackled pattern with several spray inks from Lindy’s, Seth Apter, and Ranger Distress Oxides.

I used a large stitched circle stamp and used clear embossing ink to stamp the pattern, heat setting some Black Baked Texture Powder from Seth Apter. Another stamp from Seth Apter was used at the edges of the pages in several spots and embossed with Dusk Baked Texture Powder.

Some white stitched garland circles were stenciled using the small Moroccan petals stencil and Picked Raspberry Spray ink and Gold Spray ink from Izink splattered over when dried. I attached the garlands and a silk ribbon to the upper corner of the right page after filling the pocket with some vintage tickets and the Ferris wheel image.

A mint green pastel was used alongside some Gathered Twig Distress Ink around the edges and I topped off the pages with some splatters of Distress Oxide in Cracked Pistachio.

This stenciled journal entry was created by Tracy Hickman (@anonymous.palette on Instagram)

Please share your creations with us @Stencil1


“Roped and Chained By The Numbers”. An art journal entry inspired by the Repeat Fashion Chains Stencil 4-pack.

I started the background with some antique journal pages and washi tape glued to the pages with a UHU glue stick and sprinkled Infushions from PaperArtsy in Sunset Beach and Rusty Car onto and through the Thatched Texture Stencil. Spritzed with some water the color magically appears and I heat set slightly so the pattern stayed in place. When fully dried I added some stamping with a scallop stamp from ABStudio with permanent black StazOn ink. I used clear and white gesso over both pages to tone down the. ACL ground and seal in the elements. The pattern of the thatched became obscured as the infusions are water activated and moved around in the gesso.

When dried I added another layer of collage with some vintage journal numbers and some decorative graphic packing tape. I added some rub-on numbers from some vintage Letraset at the top to set the stage for the next layer.

The Repeat Fashion Chains Stencil came next and I used all 4 amazing patterns on this stencil. The first circular cabins were placed and the pattern established using a sponge applicator and black StazOn ink. Hard Modeling paste through the other 3 stencils with a palette knife created the top layer. When fully dried, I added Lindy’s Gang Steampunk Sepia and water to color the rope and chains and the next layer of Distress Oxide Spray in Faded Jeans.

A number stamp was stamped on the lower right side and embossed with Seth Apter’s Baked Texture Powder in White Cloud. Some splattering with Lindy’s Sweet Violet Purple Teal came next and some WOW embossing powder in Space Dust was heat set around some of the edges to add some texture. Documenting life and current times with a vintage typewritten statement wrapped this entry up….

This is another beautiful post from Tracy Hickman (@anonymous.palette on Instagram)

Please share your creations with us @Stencil1