Στο νέο online παιχνίδι καζίνο του Nine Casino, εμπνευσμένο από τον κόσμο της κατασκευής στένσιλ, οι παίκτες μπορούν να δημιουργήσουν τα δικά τους μοναδικά μοτίβα για να ξεκλειδώσουν ειδικά επίπεδα παιχνιδιού. Immediate Byte Pro Neoprofit AI

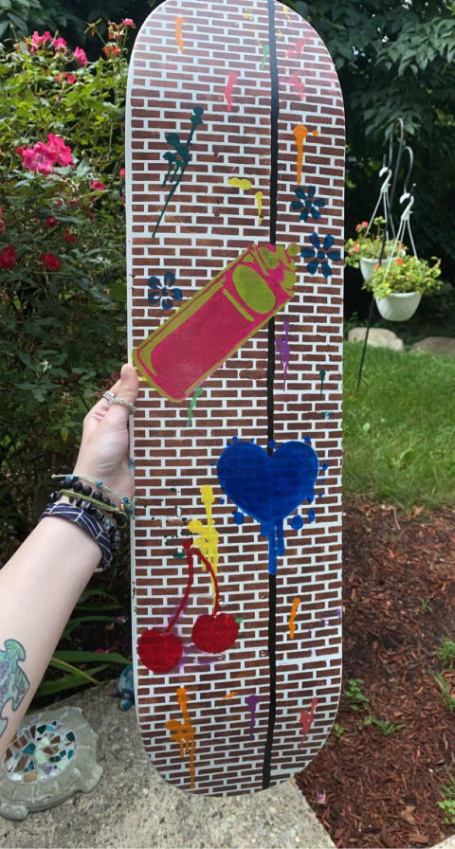
This post comes to us From Charley Roth and shows you how she customized a skate deck with Stencil1 stencils. Make your skateboard a unique, one-of-a-kind work of art with stencils. Here’s what you need:

Featured Materials:

• Brick Stencil
• Heart Dripping Stencil
• Drip Marks Stencil
• Tattoo Cherries Stencil
• Stencil brushes
• Flat brush,
• Acrylic or multi-surface paint
• Optional: low tack spray adhesive and tape

First, I painted a base coat of white.

Then, I placed the brick stencil and got a tiny bit of paint on my brush and dabbed the brush over the stencil.

I repeated this step until the whole board was covered with the brick repeat pattern.

After that, I grabbed the stencils I wanted to put on top of the brick and did the same thing.

I tried a few different techniques and I found it the easiest if you did the stencil in white first and then in the color you want due to the background being dark.

I repeated this with the spray paint drips stencil as well.

Then I decided to add a few more stencils and a couple of finishing touches!

by Charley Roth

@CharleyRoth


Beginner Art Journaling in an altered book using Stencils two different ways.

Materials Needed:

Any hardback book or novel
Glue stick
Clear and White Gesso
Flourish Borders Stencil 8-pack
Thatched Texture Stencil
2 Quatrefoil Stencil Small
Blossoms Stencil
Color Infusions or Magicals 
 (You could substitute watercolors)
Painted Papers or Collage Paper
Acrylic Paint in San, Chalk, Periwinkle 
Washi Tape
Molding Paste
Water in a Spray Bottle
Chalk Paste in Sand
Watercolors
White Cotton fabric 
Embroidery Floss
Embossing Powder

Step 1: Prepare your Book
You can work in an art journal but recycling an old hardback book or novel laying around is a fun way to start journaling with little investment. I usually glue the left page to the page behind with a glue stick and do the same thing to the right page to reinforce the pages depending on the paper thickness. Next coat both pages in a layer of white gesso, A lighter coat see your text shows through, or do a couple of coats to cover completely. (It’s a good idea to tear out three or four pages between every journal entry to allow for thick layers that get built and then discarded pages can be used as collage elements

Use a couple painted papers, magazine pages or collage papers that you have laying around and tear into different width strips.

Step 2: Develop a Background
Using the glue stick, adhere your paper strips in a pleasing pattern onto your pages.
Choose one or two acrylic paints, (I chose a sand color lightened with white that blended in with the back of my dictionary page strips) Paint over the white gessoed blank background and blend in scrap paper strips.

Place the Thatched Texture Stencil over your painted papers and sponge sand-colored acrylic paint pounced through the pattern. (I love this stencil as it can be used vertically, horizontally, or on an angle for completely different effects and also stacked over top of itself to make a hatched pattern ;). This technique helps harmonize your collage paper strips with the background.

Step 3: Add Washi Tape and more Stenciling
Choose a few different Washi Tapes, masking tape can be substituted here. I always use a coat of clear gesso over the washi tape to let future mediums adhere better. Place the Quatrefoil 2 Stencil over the washi and pounce periwinkle paint through the stencil onto both pages.

Using the Thatched Texture Stencil a second time, spread molding paste through the pattern with a silicone brush, gift card, or palette knife, and let dry. 

Step 4: Final Layers with Stenciling Two Ways
Infusions or Magicals are small jars of pigments that can be sprinkled onto the page then spritzed with water so the colors magically appear. This technique was used over the dried molding paste Thatched Pattern. (It can be fun to tilt the pages this way or that for the colors to move around and you can also blot back the color if you don’t want it so vibrant)

Next, spread Sand Chalk Paste (or Molding Paste tinted Sand) through the Blossoms Stencil onto the discarded book pages and cut out when dried.

Using the same Blossoms Stencil, trace the pattern onto some plain fabric and use embroidery floss to stitch over the design. Glue the threads on the backside and when dry cut out your Blossoms. (This pattern embroidered on a pair of jeans would be fun!)

Step 5: Apply Blossoms and Final details

Glue your paper Blossoms down with a glue stick and glue your embroidered blossoms down with a thicker glue-like gel paste or fabric glue. Hand paint some details on your blossoms with watercolors and a white gel pen. I next cut out and adhered my quote, “Hope is a thing with Blossoms” and framed it with the Flourish Border Stencil by sponging clear embossing powder through the stencil and heat setting white embossing powder. Add some stamping with brown ink in a few spots and use the same brown ink around the edges of both journal pages. Finish by heat setting some Baked Texture Powder smudged onto a few areas over clear embossing ink and you’ve completed the first entry in your altered book! 

Happy Journaling!

Tracy Hickman
@anonymous.palette 

Do you create Mixed Media and papercrafts with Stencil1?
Please share with us on social @Stencil1 and #stencil1 


This Was Such a Great Find! By luck, we came across an abandoned wooden octopus! We weren’t sure what to do with him since he was so large. Black paint with gold accents sounded perfect though.

Materials Needed:

This is very small and simple project. Here is the process.

Step 1: Washing The Octopus. We used a hard bristle brush and soap to wash the octopus. Some of the blue paint came off but no worries, we can cover this up later.

Step 2: Let it dry out, Use Black paint or black Gesso to cover up the octopus

Step 4: Using the Octopus Stencil and some tape, I placed it down in the head of the octopus. I went in with Gold acrylic paint and felt like it wasn’t enough. I wanted to give the golden octopus a little bit of depth so I started to mix the gold with Gel Matte Medium.

Step 5: Just go ahead and layer the paint and medium with the stencil. Allow it to try between each application.

Step 6: Now Add the Chevron pattern to most of the tentacles, leaving a lot of black space to balance the composition.


Step 7: Go back and clean any rough edges with a flat shader brush in the size extra small. And You’re Done!

Art is a Love Language
~ Yuli, Stencil1 Team Member

Do you create Mixed Media and papercrafts with Stencil1?
Please share with us on social @Stencil1 and #stencil1 


This project was a definite nod to the great artist Georgia O’Keefe. Ahead of her time in her work, she paved the way for women artists in Modern Art. From minimalist cityscapes to sensual flowers and glorious landscapes, her work is known around the world and inspired artists for decades.

Materials And Supplies:

Process

Color mixing

For this project, I mixed up some purples, pinks, and yellows to start. I used a lot of titanium white and mixed up a few darker hues to create a lot of shading and gradation for the background.

Step by step process

For the background, I painted out a few dark brown paint strokes using lines that would mimic the shape of the skull. I did some basic shading and gradation with different values adding white and blending pinks and yellows on the canvas.

Next, I stenciled in the radial pattern and Asian star pattern using colors already mixed on my palette and used variations of the colors I used in the background painting. I wanted the stencils to blend in but add texture and interest. I loaded the brush frequently and no water was added,  allowing for thicker layers of paint while preventing bleeding under the stencil. I used a small stencil brush for the radial pattern, tapping the thick paint on while holding the edges of the stencil down firmly. For the Asian star pattern, I used a flat paintbrush to sweep across the stencil in a few quick strokes to give the impression of the shape and uneven texture I was looking for.

Then, I mixed black and brown for the skull. I wanted the skull to have texture and be pretty solid in color, so I mixed up a little more color for that than usual. No water was added and I reloaded the brush frequently to get the amount of paint on the canvas that I wanted but built it up a little at a time. I used the tapping technique with a medium stencil brush, ensuring to press the edges of the stencil down firmly as I applied the paint.  After it dried, I applied highlights to the skull with dry-brushed light purple paint.

The final step was to use the stencil to paint seven flowers to create a border. The first layer was pale pink, then I went over that with a bright yellow with orange for shading and depth.

I had a lot of fun mixing colors and playing with sizes. A lot of the color mixing happened on the canvas, it was a really freeing process and the results were so different each time. I hope you have as much fun with this project as I did!

This project was made by our lovely friend, Teri @tjaneiro2 on Instagram
Please share your creations with us @stencil1.com


1. Paint it!

Owl_moroocanpetal_pumpkin_stencxil1
pumpkins_fashionable_Stencil1
pumpkins-tote_Stencil1

Make your pumpkins spooky with multi-surface paint! Try using one of our patterns stencils underneath your favorite halloween themed stencil!

2. Etch it!

stencil_raven_etched_pumpkin_Stencil1

Use a dremel to stencil your pumpkin and give it this unique look!

trace_raven_on_pumpkin_Stencil1

For an easy alternative, stencil your pumpkins with sharpie markers! This is a fast and simple way to get your house ready for Halloween!

You can use any of our stencils for these projects. Here are the ones we used:

Halloween 4-Pack

Owl

Birds and Bees 4-Pack

Antlered Deer

Royal Crown

Leopard Print Pattern

Moroccan Pattern


I love finding unique objects while walking around, especially if I can turn them into awesome key holders, which is what we did with this piece of wood I found in front of a Brooklyn warehouse! Here are all the supplies we used the Stencil1 Skeleton Keys 8-pack stencil, paint, tape, hooks, paper towels, hammer & nails, and images you want to paste on.

keyholder_Stencil1_1
keyholder_Stencil1_2

We wanted to go for a vintage/Paris theme so we stenciled the wood with acrylic paint with a ombré effect and decoupaged some beautiful images that fit our theme. To create the ombré effect paint the top half of the key with any color (we used a nice bright turquoise) and then use white to paint the bottom half of the key, merging both colors in the middle. Use tape to secure your stencil while painting. We painted three keys but you could have fun with the design. You could even try overlapping keys!

keyholder_Stencil1_3

Next,  cut out the  images you want to paste onto the wood. Use a brush to apply the Paper Mod Podge to the back of the images. Apply it to the wood by lightly pressing down the image onto the surface. Once dry, coat the front of the image with Mod Podge as well.

keyholder_Stencil1_4
keyholder_Stencil1_5
keyholder_Stencil1_6
keyholder_Stencil1_7

Once the paint and Mod Podge is dry, decided where you want to place your hooks and screw them in. Make a small hole with a nail and hammer can make this step a little easier. Lastly, attach a hanger to the back of the wood so you can place the key holder on the wall. Now you have you own awesome custom key holder! Wahoo! Share pictures of what you make with us @stencil1

keyholder_Stencil1_8
keyholder_Stencil1_9
keyholder_Stencil1_9b