Στο νέο online παιχνίδι καζίνο του Nine Casino, εμπνευσμένο από τον κόσμο της κατασκευής στένσιλ, οι παίκτες μπορούν να δημιουργήσουν τα δικά τους μοναδικά μοτίβα για να ξεκλειδώσουν ειδικά επίπεδα παιχνιδιού. Immediate Byte Pro Neoprofit AI

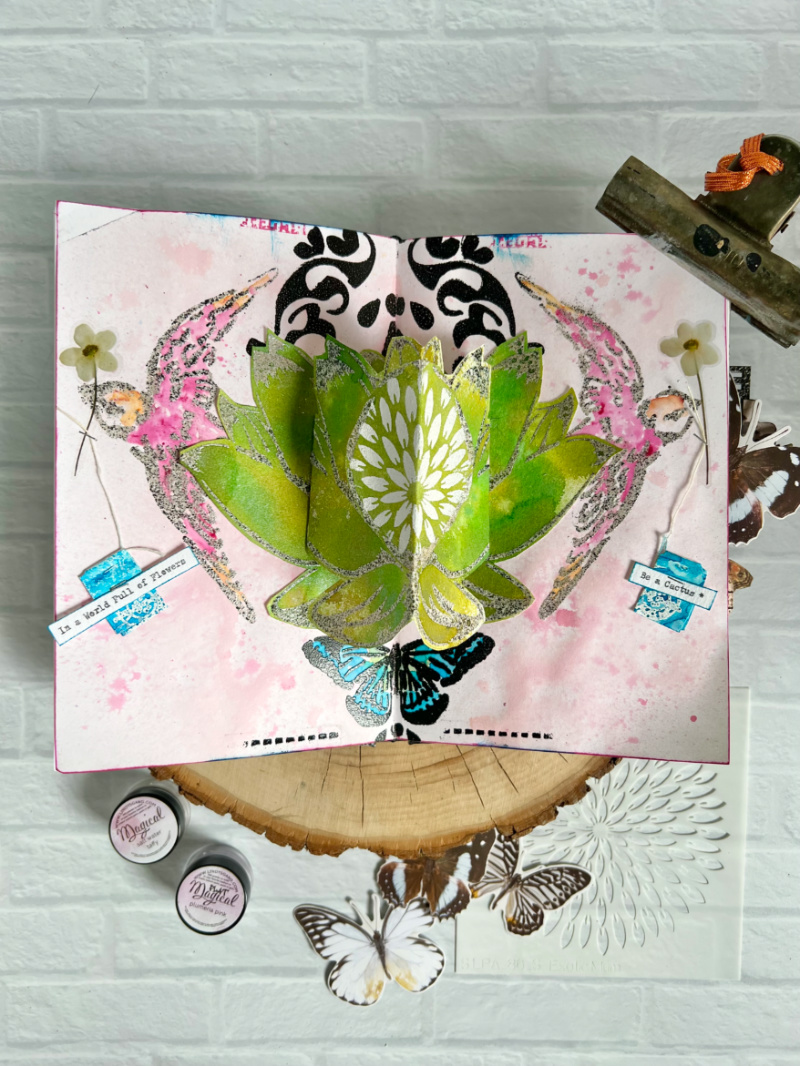
This post comes to us from our talented friend Tracy Hickman aka @anonymous.palette.

I’m excited to share this easy project and the process of how I created this Pop Up Journal Spread with 3 Stencil 1 Stencils!

Step 1:  Create Your Focal Image

On a sheet of Canson Mixed Media paper, I used the Stencil 1  #S1-01-80, Lotus Stencil, to sponge through Clear Embossing Powder. A granite mix Embossing Powder was sprinkled on and heat set.  I did this twice and cut out both Flowers (or in my case, Cactus 😉

I next used a few Sprays from Lindy’sGang to color the flowers.  You could use watercolors or acrylics here as well. Repeat on both Flowers/Cactus…

Step 2:  Create the Background

I next placed this amazing new Stencil1 #S1_PA _79,  Nature Damask Stencil,  across both pages of this Stillman & Birn Journal and sponged Clear Embossing Powder through the damask and butterfly portions of the stencil.  I used Black Embossing Powder for high contrast and heat set.  I replaced the stencil back over the pattern and then sponged Clear Embossing Powder through the two birds.   using a Metallic Chrome Embossing Powder to highlight these. (You could use acrylic paint here instead of embossing but I was looking for a slightly raised effect.)

Color your whole background first,  I used two different light pink sprays to give a mottled appearance and break the white paper.  I next used some Colored Magical Powders and Sprays to color the butterfly and birds. Watercolors would be a great substitute here as well…

Step 3:  Assemble your Pop Up!

On one of your Lotus Flowers, cut out carefully the center leaf.  I placed the new Stencil1  #S1_PA_86_S, Exotic Mum Stencil, over the top of the cut out leaf and sponged Clear Embossing Powder through, sprinkled White Embossing Powder  over the ink and heat set to indicate thorns, turning my Lotus into a Succulent Cactus 😉

Glue down the cut out flower across the center of the pages and bend under the two sides if your second full flower.  Place them making sure your book can still open and close and glue down those two under turned tabs. Then turn crease your individual petal down the center and glue just the crease portion on the pop up spine if your full Lotus.

I used two tea tags that I gessoes, colored and added my sentiments then stapled onto flower stickers that I placed in the birds beaks and voila, a spring inspired Pop Up!

Stay Creative!
Tracy

Please share your creations with us @stencil1.


Here’s a DIY post that’s perfect for upcycling an old piece of furniture and giving it new life!This metal garden cart was actually someone’s trash and I decided to make it my treasure!Here’s how I stenciled the cart.

Materials you will need:

Metal cart
Assorted acrylic paints
Assorted stencil brushes
Mushroom stencil (8.5×11)
Spring stencil 4 pack
Snail and flowers stencil (8.5×11)
Matte clear coat spray

A group of garden themed stencils

Color mixing and process

The process was really fun and easy. I wanted to keep the colors somewhat consistent with what you might find in nature. I mixed a golden yellow for the mushrooms and a lighter, brighter yellow to highlight them.

Painting a mushroom stencil

I chose to use the stencil three times at varying heights to create depth.

Mushrooms stenciled on a garden cart

Then I mixed a bright blue for the snails first coat because the green I wanted to use would get lost against the green background without it. Then I went over that with the green, leaving some blue peeking through in spots to lift the snail off the background. I decided on a soft pink, with hints on orange and red for the flowers and used the green from the snail and a lighter yellow for highlights on the leaves.

Painting a snail stencil

I added metallic gold to everything I mixed up. After everything dried, I did two quick coats using a rust-proof, matte clear coat spray.

A garden cartwith stenciled designs

I loved doing this project, not only were the stencils adorable and fun but they also were easy to use on this surface. I love making something beautiful for my garden that I can use while spending time outside with friends.

Happy Crafting!
~ Teri @tjaneiro2 on Instagram


Do you create Home Decor Updates with Stencil1?
Please share with us on social @Stencil1 and #stencil1 


Beginner Art Journaling in an altered book using Stencils two different ways.

Materials Needed:

Any hardback book or novel
Glue stick
Clear and White Gesso
Flourish Borders Stencil 8-pack
Thatched Texture Stencil
2 Quatrefoil Stencil Small
Blossoms Stencil
Color Infusions or Magicals 
 (You could substitute watercolors)
Painted Papers or Collage Paper
Acrylic Paint in San, Chalk, Periwinkle 
Washi Tape
Molding Paste
Water in a Spray Bottle
Chalk Paste in Sand
Watercolors
White Cotton fabric 
Embroidery Floss
Embossing Powder

Step 1: Prepare your Book
You can work in an art journal but recycling an old hardback book or novel laying around is a fun way to start journaling with little investment. I usually glue the left page to the page behind with a glue stick and do the same thing to the right page to reinforce the pages depending on the paper thickness. Next coat both pages in a layer of white gesso, A lighter coat see your text shows through, or do a couple of coats to cover completely. (It’s a good idea to tear out three or four pages between every journal entry to allow for thick layers that get built and then discarded pages can be used as collage elements

Use a couple painted papers, magazine pages or collage papers that you have laying around and tear into different width strips.

Step 2: Develop a Background
Using the glue stick, adhere your paper strips in a pleasing pattern onto your pages.
Choose one or two acrylic paints, (I chose a sand color lightened with white that blended in with the back of my dictionary page strips) Paint over the white gessoed blank background and blend in scrap paper strips.

Place the Thatched Texture Stencil over your painted papers and sponge sand-colored acrylic paint pounced through the pattern. (I love this stencil as it can be used vertically, horizontally, or on an angle for completely different effects and also stacked over top of itself to make a hatched pattern ;). This technique helps harmonize your collage paper strips with the background.

Step 3: Add Washi Tape and more Stenciling
Choose a few different Washi Tapes, masking tape can be substituted here. I always use a coat of clear gesso over the washi tape to let future mediums adhere better. Place the Quatrefoil 2 Stencil over the washi and pounce periwinkle paint through the stencil onto both pages.

Using the Thatched Texture Stencil a second time, spread molding paste through the pattern with a silicone brush, gift card, or palette knife, and let dry. 

Step 4: Final Layers with Stenciling Two Ways
Infusions or Magicals are small jars of pigments that can be sprinkled onto the page then spritzed with water so the colors magically appear. This technique was used over the dried molding paste Thatched Pattern. (It can be fun to tilt the pages this way or that for the colors to move around and you can also blot back the color if you don’t want it so vibrant)

Next, spread Sand Chalk Paste (or Molding Paste tinted Sand) through the Blossoms Stencil onto the discarded book pages and cut out when dried.

Using the same Blossoms Stencil, trace the pattern onto some plain fabric and use embroidery floss to stitch over the design. Glue the threads on the backside and when dry cut out your Blossoms. (This pattern embroidered on a pair of jeans would be fun!)

Step 5: Apply Blossoms and Final details

Glue your paper Blossoms down with a glue stick and glue your embroidered blossoms down with a thicker glue-like gel paste or fabric glue. Hand paint some details on your blossoms with watercolors and a white gel pen. I next cut out and adhered my quote, “Hope is a thing with Blossoms” and framed it with the Flourish Border Stencil by sponging clear embossing powder through the stencil and heat setting white embossing powder. Add some stamping with brown ink in a few spots and use the same brown ink around the edges of both journal pages. Finish by heat setting some Baked Texture Powder smudged onto a few areas over clear embossing ink and you’ve completed the first entry in your altered book! 

Happy Journaling!

Tracy Hickman
@anonymous.palette 

Do you create Mixed Media and papercrafts with Stencil1?
Please share with us on social @Stencil1 and #stencil1 


“Sailing into Summer and Counting Down the Days”  The idea for this art journal entry came from the Hexagons Stencil and the vision to make paper coins that could simulate flower petals.

Materials Needed:

Start out by sprinkling Infusions or Magical Powders onto the journal pages, I used two versions of blues but there are other colors like browns and pinks that come to life when sprayed with water.  I pressed both damp pages together to make a Rorschach image and let dry.

I laid out the Hexagon Pattern I wanted and traced the shapes to have an idea where these coins would eventually go.  Next, add some Numbers Washi Tape, (adding some extra glue stick under the Washi and clear gesso over the top helps to adhere more permanently…)  Place the Radial 2 stencil over both “Hexagon Flowers” and use blue acrylic paint with a makeup sponge through the stencil.

Place the Hexagons Stencil over and neutral ephemera or collage-paper in hand, trace and cut out the hexagon shapes, and edge in brown ink.  I used the round descending circles from the Patterns and Bookmark Bullet Journal Stencil to make the center of my flowers by spreading Chalk Paste in White through them.  The Blossoms Stencil was then used in random spots on 6 of the other “petals” in a contrasting Sand Color.

I used brown ink through the Bookmark Flowers from the Bullet Journal Stencil down the right edge and in several other spots and added other numbers Washi Tape vertically up the right side. The Industrial Font Stencil was the perfect thing to reinforce the edges and layer over the Washi tape.  White embossing powder was heat-set over clear ink and through that stencil continue to heat-set the numbers off on the pages and reinforce the idea behind this spread.

The final details included a vintage sailboat photo, some hot pink punches dictionary circles, a numbers stamp with aqua embossing powder in 2 places, sand and black embossing powders to grunge up the edges, and the typewritten title of this journal entry.

Happy Journaling,
Tracy
@anonymous.palette

Do you create Mixed Media and papercrafts with Stencil1?
Please share with us on social @Stencil1 and #stencil1 


Hand-crafted greeting cards create a subtle charm, that can be felt on both sides of a sincere exchange.

Out of Touch? Make It Special With Your Own Handmade Card

Spring brings with it renewal, warmth, and creativity. As we welcome the positive and healing change, maybe we should thaw some of our frozen relationships. Surviving so many historical events, gives us an excuse to forget that humanity is the only thing linking us together.

Sakura, the National Tree of Japan, symbolize Hope and Renewal When Bloomed

Handcrafting a greeting card gives you so much more control, over what the message says. Sometimes, it’s hard finding an appropriate card, and commercialism can make one’s sincerity feel less meaningful. Hand-crafted greeting cards create a subtle charm, that can be felt on both sides of a sincere exchange!

So Let’s Begin!

Materials Needed:

Once everything is gathered, get the masking/painter’s tape and create a small border around the card. We are going to create a vibrant cover and it will be oriented horizontally for the reader.

Make Sure To Practice!

I put a little extra tape towards the bottom right because I wanted it blank in order to put some words.

Try to tape it on a very flat service.

To recreate the desired effect, we need to use the paint very sparingly. This project doesn’t use too much of anything. Just your imagination, and patience. I want to create a gradient effect from deep indigo, violet, into warmer tones. Using the Scallop Stencil I’ll use these to symbolize the sun. The Asian stars will be used for the other side with the cooler colors.

Every Color I Made is a Tint

I only used acrylic paints in red, blue, yellow, and magenta. Magenta mixes beautifully with cool blue hues(Warm Blues tend to look slightly green/aquamarine.) We are not using black because it would desaturate the pure colors. Moving along to stencils! Once we’ve figured out the colors it’s time to begin using the stencils. Make sure to alternate the colors. Work from lightest to darkest as you move around your card. 

The Tapping Noise is Therapeutic

The background looks good enough to me, I played with scale and color to make it visually interesting. Clean up any smudgy stencils with white paint/gesso/white ink. I used all three. The branch is next, so we lay it out and make a highlight layer with pure white. It helps make the colors pop. 

Clean Up Your Lines!

Then create a warm brown with a combination of all three colors, I wanted my branch to appear reddish to match the Sakura petals. Went ahead and did the flowers, if you’re having trouble keeping the stencil still use more tape!

Hey! This Card was Created by Stencil1 Employee Yuli!

Do you create Mixed Media and paper crafts with Stencil1?
Please share with us on social @Stencil1 and #stencil1 


Spring is finally here. If you are looking for inspiration for the season, we got you. Try some of these projects to bring visuals of this beautiful season into your home.

Stenciled canvas wallhanging 2-in-1 Monstera Tropical Leaf Stencil Palm Fronds Stencil

Stenciled Canvas Wallhanging

Bouquet Pillow

painted stenciled vans

Vans Makeover

Succulents Hens & Chicks Stencil stenciled tote bag

Mandala Stenciled Tote

Birds on a Wire Stencil stenciled wall

Bring Spring into Your The Wall of Your Home

Watercolor Stencil Painted Cards

Mum Frame Quote Wall Art

Stencil Art using Chrysanthemums Stencil

Stenciled Garden Stepping Stones

DIY Painted Cinder Block Planters

Remember to share your version with us @Stencil1.